v8.18.0 of Abandoned Cart Pro for WooCommerce plugin lets users connect our plugin to FluentCRM. This WordPress based CRM has many features like contacts, lists, tags, automations etc.
Using the integration, you will be able to send abandoned cart information as well as customer email addresses to FluentCRM. Once they’ve been sent, you can send reminder emails and more to these shoppers!
The Basics
To make this integration happen, you will need the following:
- WooCommerce plugin
- v8.18.0 of Abandoned Cart Pro for WooCommerce plugin
- Free version of the FluentCRM plugin from the WordPress plugin library.
- FluentCRM PRO plugin. Login here and download your Pro file. Upload it to your WordPress site.
1. Creating REST API
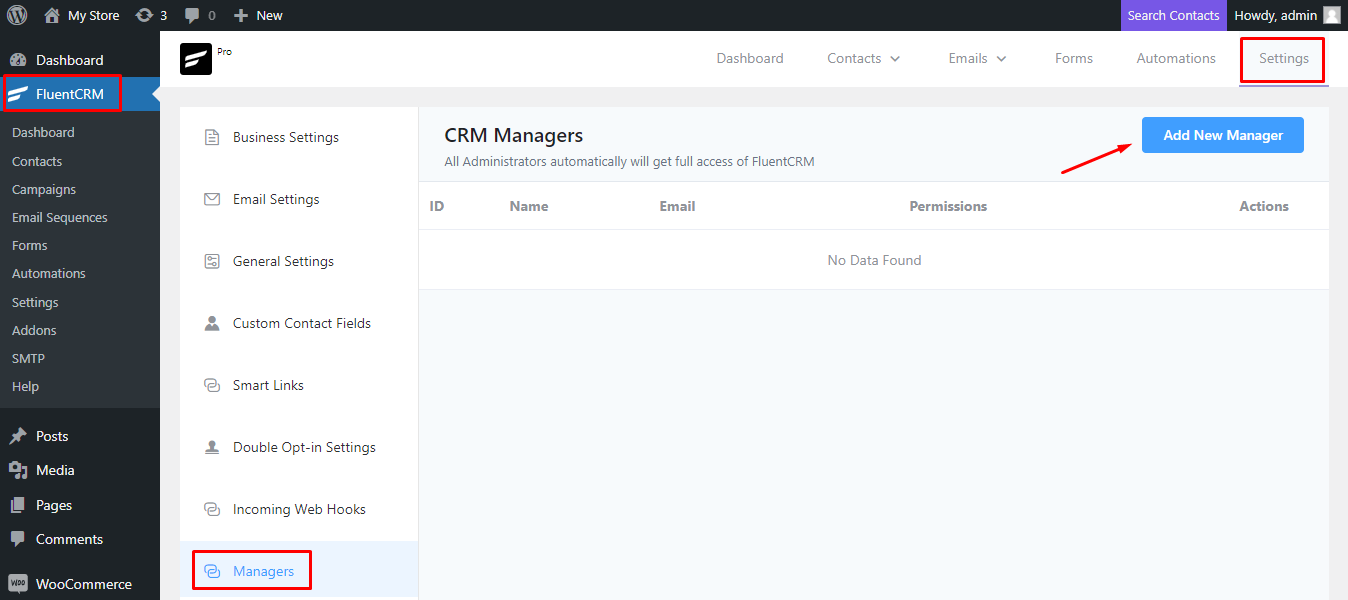
Firstly, you will have to create REST API key. Go to FluentCRM > Settings > Managers > Add New Manager.
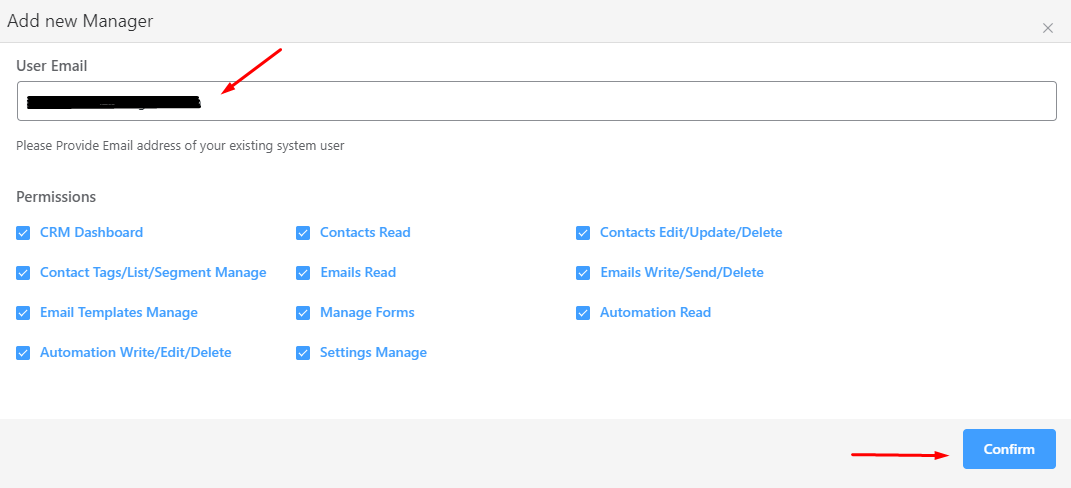
Add a manager from one your existing users. Go for one who does not have an admin access to your site- choosing a Customer role would be apt. Enter the email address of the same. After entering, select the check boxes for permissions and then click on ‘Confirm’.
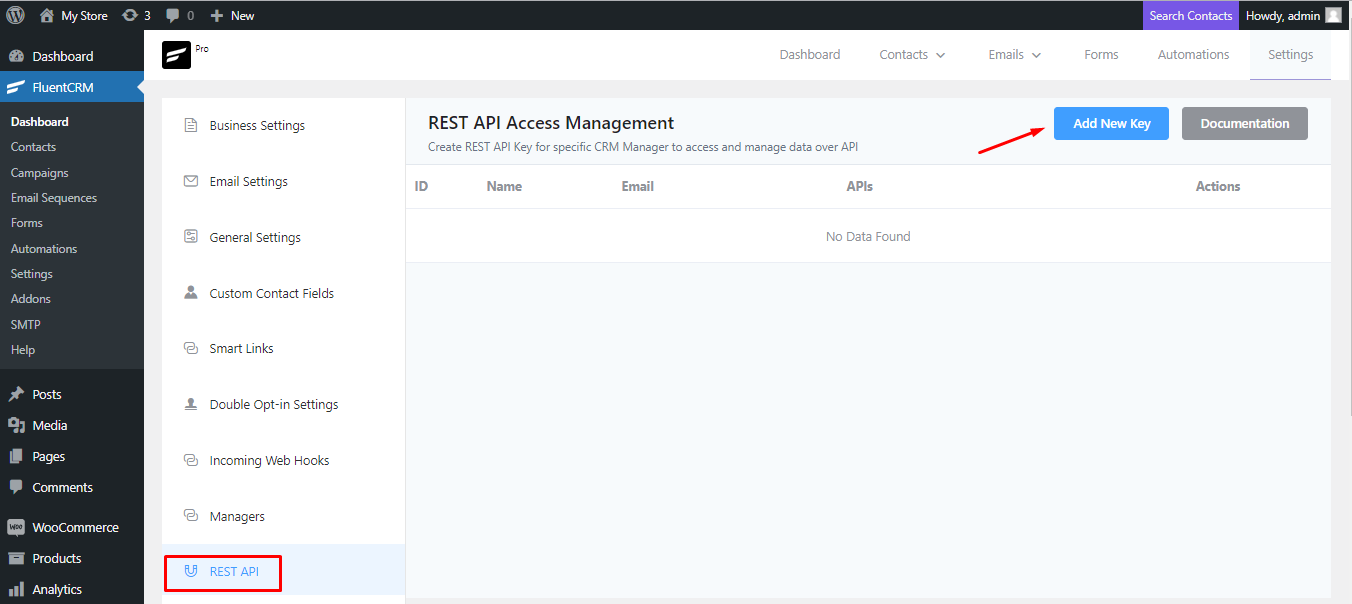
Now go to REST API tab and click on ‘Add New Key’ button as shown here:
You can add a name to your key. Let us go with the name ‘AC Pro’. Under Associate FluentCRM Manager, you will select the user email you had added earlier as a Manager. Once done, click on ‘Confirm’.

Your REST API Key will be created. Copy the API Username and Password and save it for later. Make sure to copy it correctly and save it too.

2. Creating a List
Next, you will have to create a List where all the contacts captured by the Abandoned Cart Pro will be sent. Go to Contacts > Lists.

Click on the ‘Create List’ button located on the top right-hand corner.

Give a Title to the List and click on ‘Confirm’.

3. Connecting FluentCRM with Abandoned Cart Pro plugin
Now you need to connect FluentCRM with the Abandoned Cart Pro plugin. Go to WooCommerce > Abandoned Carts > Settings > Connectors:

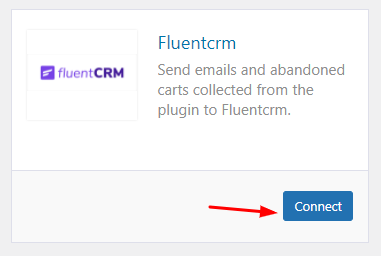
Scroll down and find the FluentCRM option. Click on the ‘Connect’ button:
Enter the API Username and Password that you had collected earlier and click on ‘Next Step’:
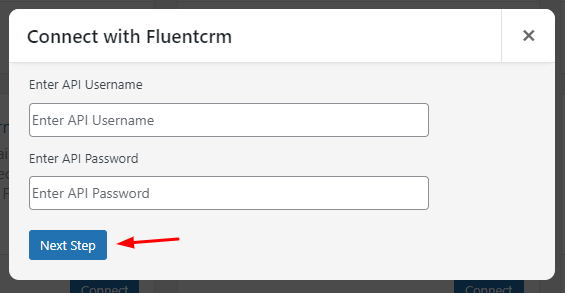
You will get the option to select a default list where the contacts captured by the abandoned cart will be sent. Since we had created a list called Abandoned Cart for this, we’ll select it and click on ‘Save’.
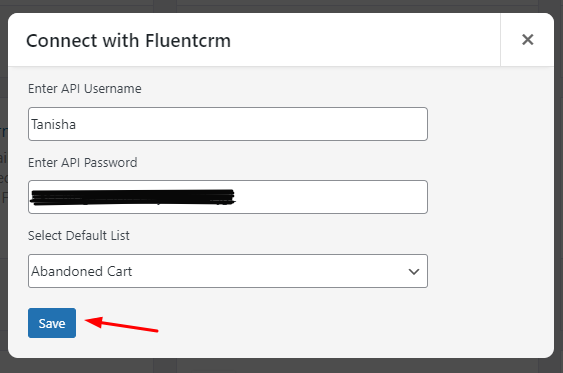
Once you’ve connected successfully, it will display the following message:
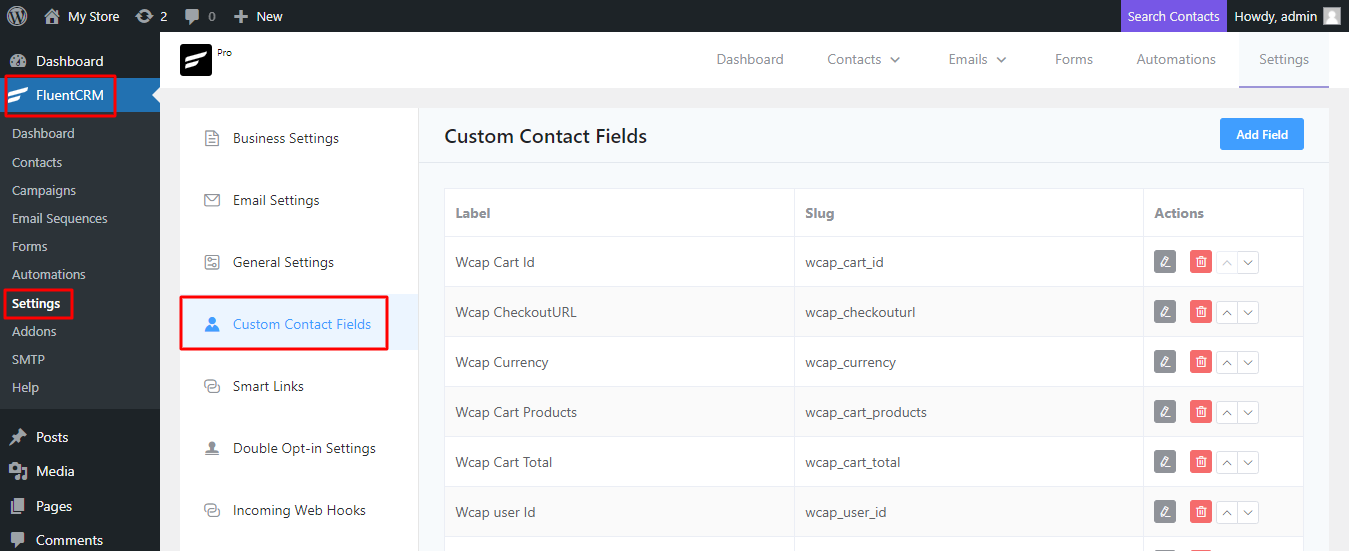
Once this is done, custom contact fields will be added. These are the fields that you can use in the email that will be sent to your customers. You can find them by going to ‘FluentCRM’ > Settings > ‘Custom Contact Fields’.
Now you need to create an automation to send mails.
*Note: It doesn’t matter whether the Abandoned Cart Pro plugin is connected to FluentCRM or not – The Abandoned Cart Pro plugin will continue to track abandoned cart users’ details every time. When connected with the FluentCRM, the tracked abandoned cart user details will be synced to the desired list in the CRM.
4. Creating an Automation
Let’s go to FluentCRM > Automations. Please click on ‘Create a New Automation’ button once you reach there:

Choose a name for the ‘Internal Label’. We have gone with ‘AC Pro’. Then, click on ‘Tag Applied’ and ‘Continue’.

Under ‘Select Tags’ go with ‘Created Cart’ tag. This would mean that the tag will get assigned to a contact and then the contact will be auto added to the automation.

After this, you can check the ‘Restart the Automation Multiple times for a contact for this event’ option. Please only enable it if you wish to restart the automation for the same contact. Finally, click on the ‘Save settings’ button.
The automation will be created as shown below:

Next, click on the + icon to add the wait period. Go to Actions > Wait X Days/Hours option:
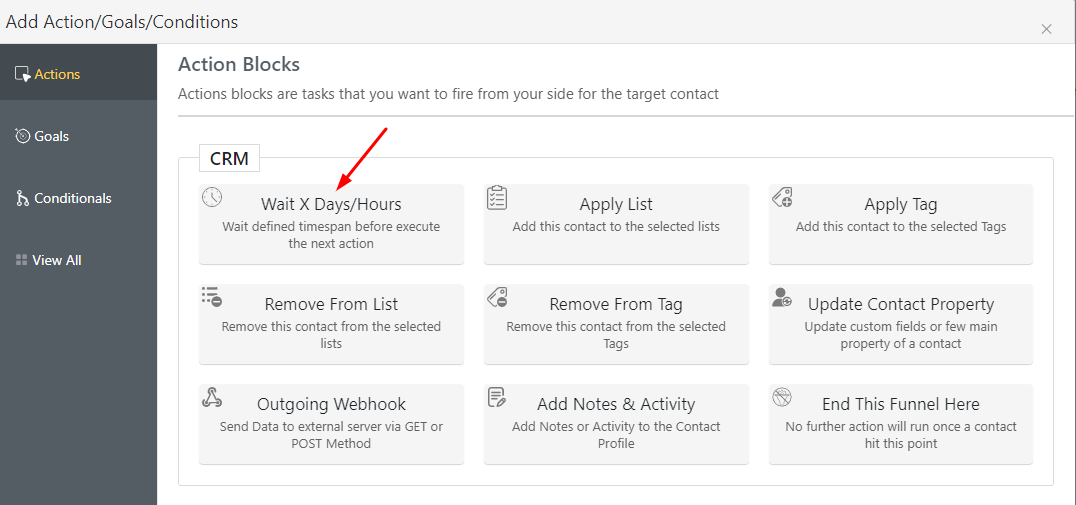
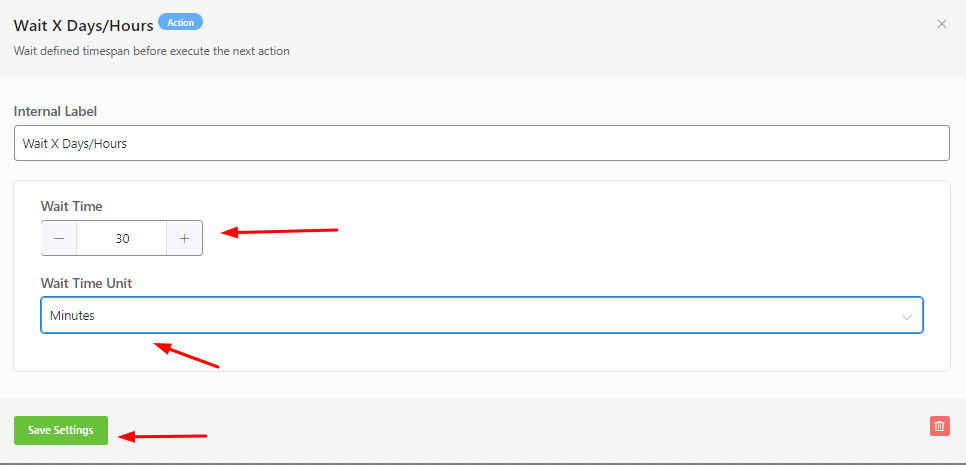
Choose the time you want to wait till the next action takes place. Let’s go with 30 minutes and click on ‘Save Settings’. Ensure to keep a gap of at least 30 mins here.
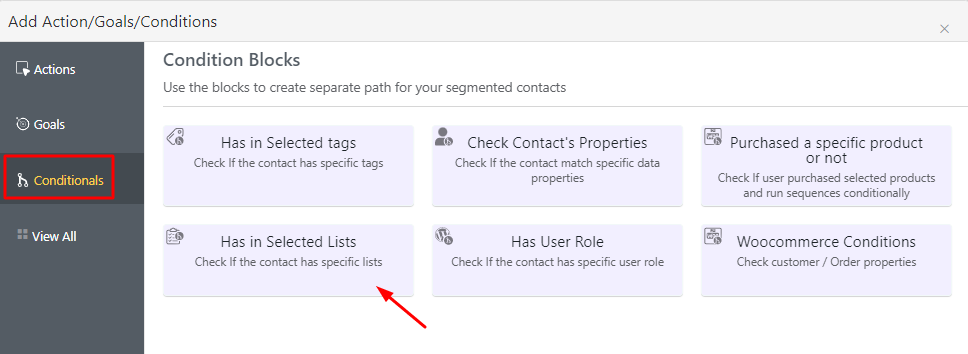
The next step is to add ‘Conditionals’. The conditional check is important to add to ensure that the cart was still abandoned (after 30 mins of creation). If it continues to remain abandoned, then we will need to send them an email reminder. If it is no longer abandoned then we would not have to send any reminders!
Moving on, you will have to choose ‘Has in Selected Lists’. This means that a contact added to a particular list will be the one that will receive the email from this workflow.
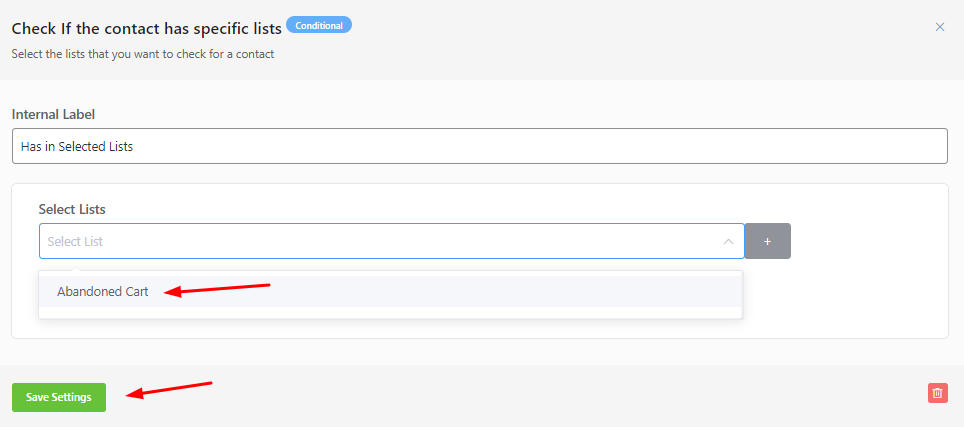
You will have to select the list that you saved in Woocommerce > Abandoned Carts > Connectors > FluentCRM settings. Click on ‘Save Settings’ once done.
The workflow will appear with 2 paths: ‘No’ and ‘Yes’ as such:
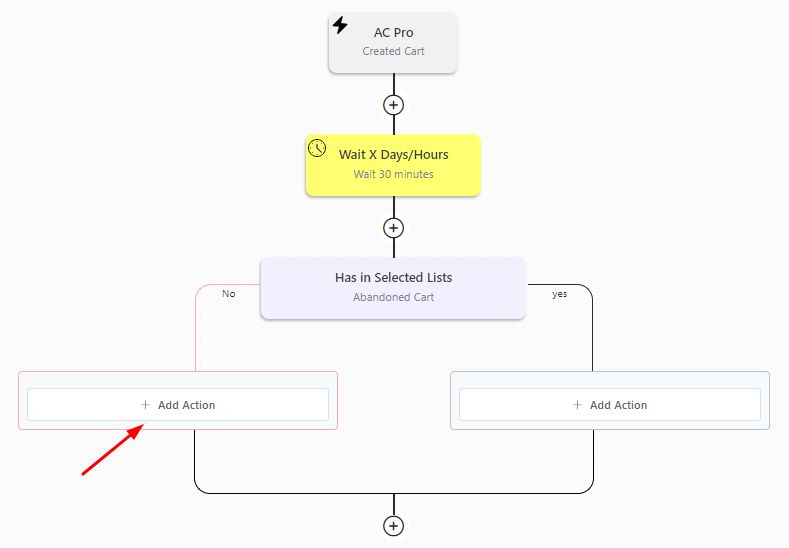
Click on ‘Add Action’ in the ‘No’ path and chose to ‘End This Funnel Here’. We’re ending the funnel here because a contact that has not been added to the list will not be required to send anything.
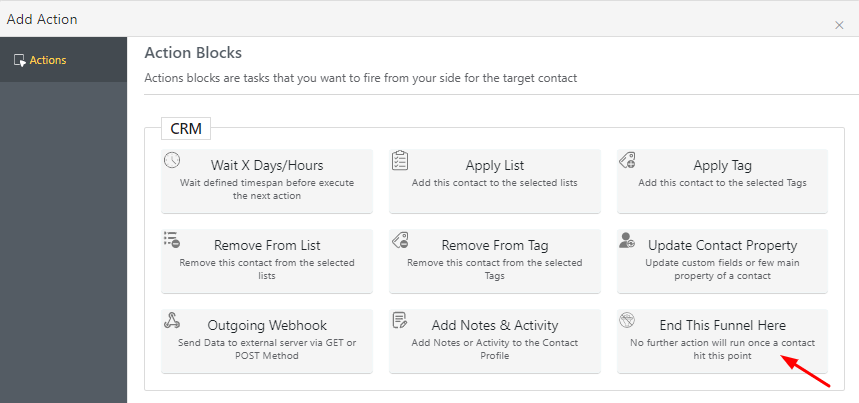
Click on ‘Save settings’.

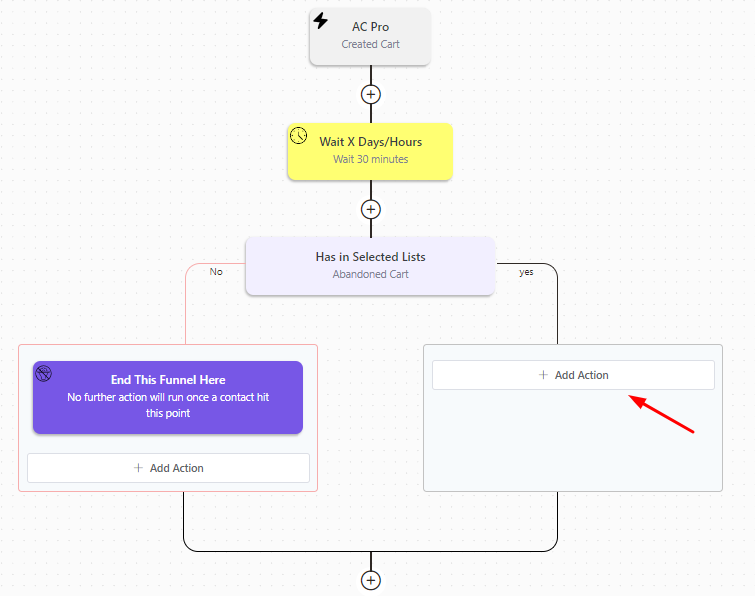
The workflow will appear like this and then we’ll go to ‘Add Action’ under the Yes pathway.
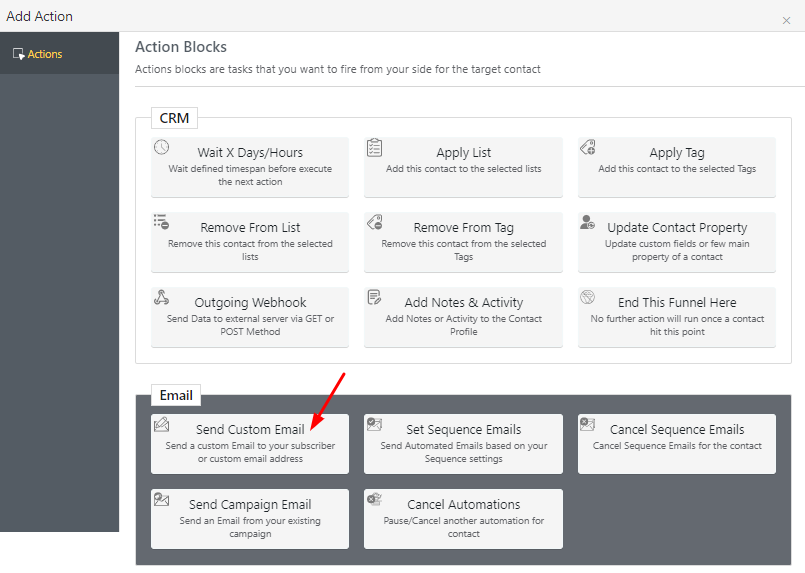
Choose ‘Send Custom Email’ option. We’re selecting this option because we wish to send them a custom email that has the abandoned cart’s information in it. Since the email can be customized, we’ll be able to add different abandoned cart merge tags. It will also help us design the email however we want!
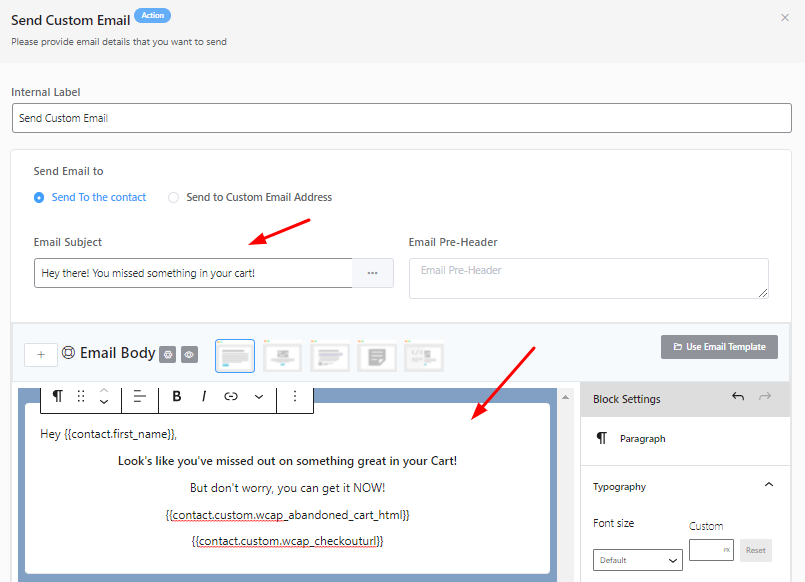
Now you can draft the email. Enter the email subject, content and other things. You can also use merge tags from the dropdown in the editor. For eg: {{contact.first_name}}
Additionally, you can add merge tags for custom tags that were created by the plugin too. Some of them include:
{{contact.custom.wcap_abandoned_cart_html}}
{{contact.custom.wcap_checkouturl}}
Here’s how we have created our custom email for reference:
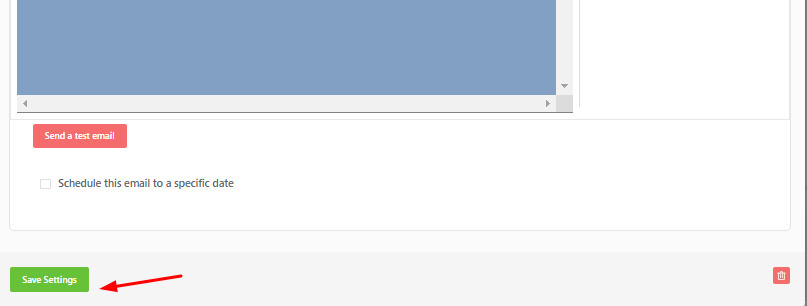
You can Send a Test Email for the same and then click on ‘Save Settings’.
As per your requirements, you can add in next steps by clicking on the + icon in the workflow. For e.g, if you wish to send another reminder then you can add a wait time and the email. If not, you can end your workflow here. So, for this, after clicking the + icon, you will add an Action and choose ‘End This Funnel Here’.
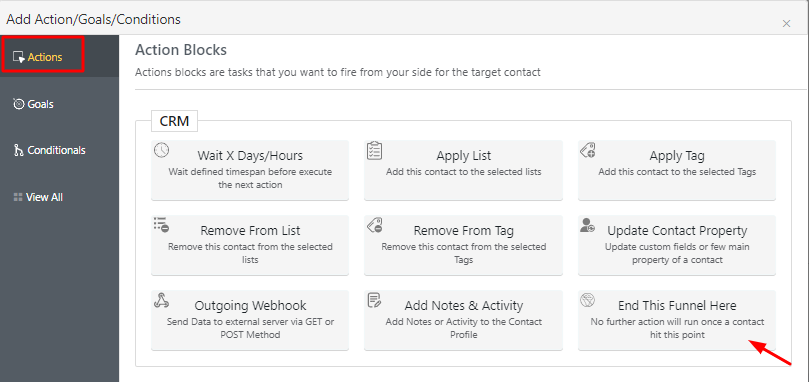
Click on ‘Save Settings.’

Your workflow shall look like this:
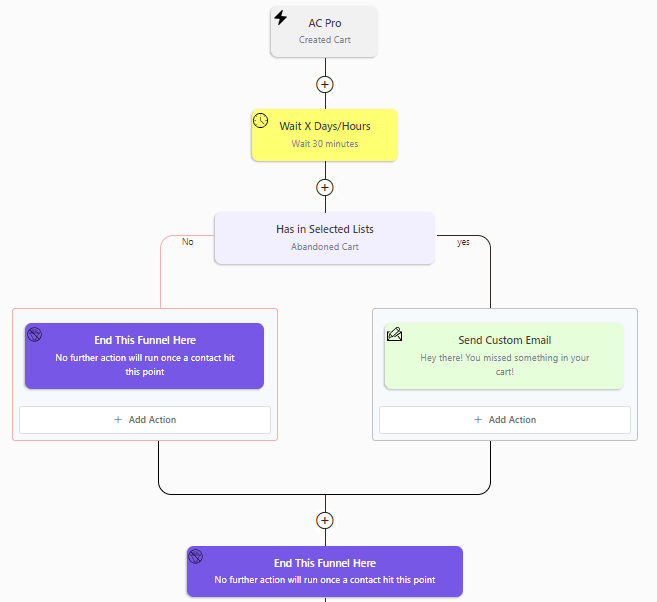
It’s time to publish it. Enable the Status toggle to do so:

5. How will it work?
Now that your setup is complete, all the carts abandoned from your site will receive reminder emails that would be sent via FluentCRM.
Let’s say that a customer abandoned ‘Designer Scarf’ on your site. Before leaving the site, they, however, entered their email address and name which was captured by the Add to Cart Popup from the Abandoned Cart plugin on your site.
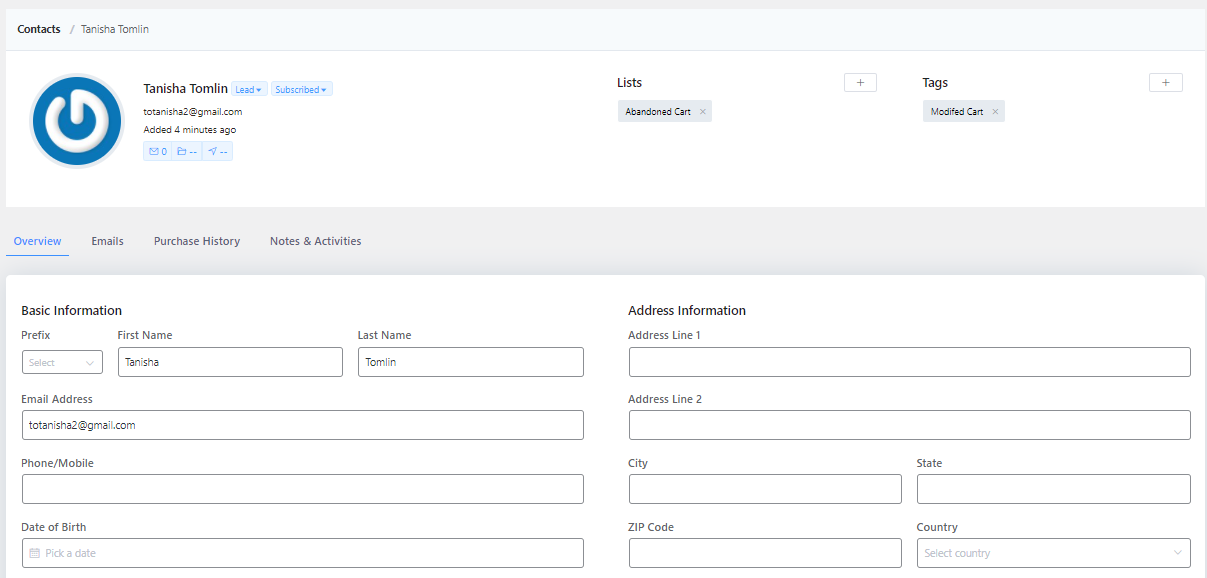
To see the information of this captured cart, go to FluentCRM > Contacts. The newly captured contact will be added here:

When you click on it, it will display all the other information captured as well. For example, since the customer entered their First and Last Name, both of these details have been added:
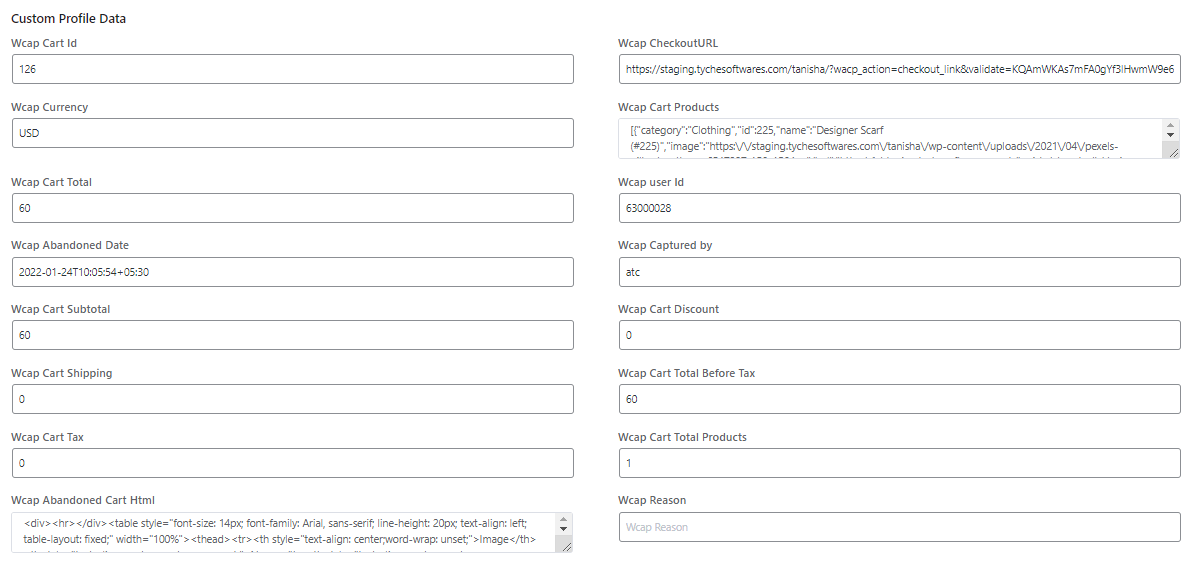
You can also find the status of the contact in the Automation by clicking on ‘Reports’.

You will get to view Chart Report as well as Individual Report:
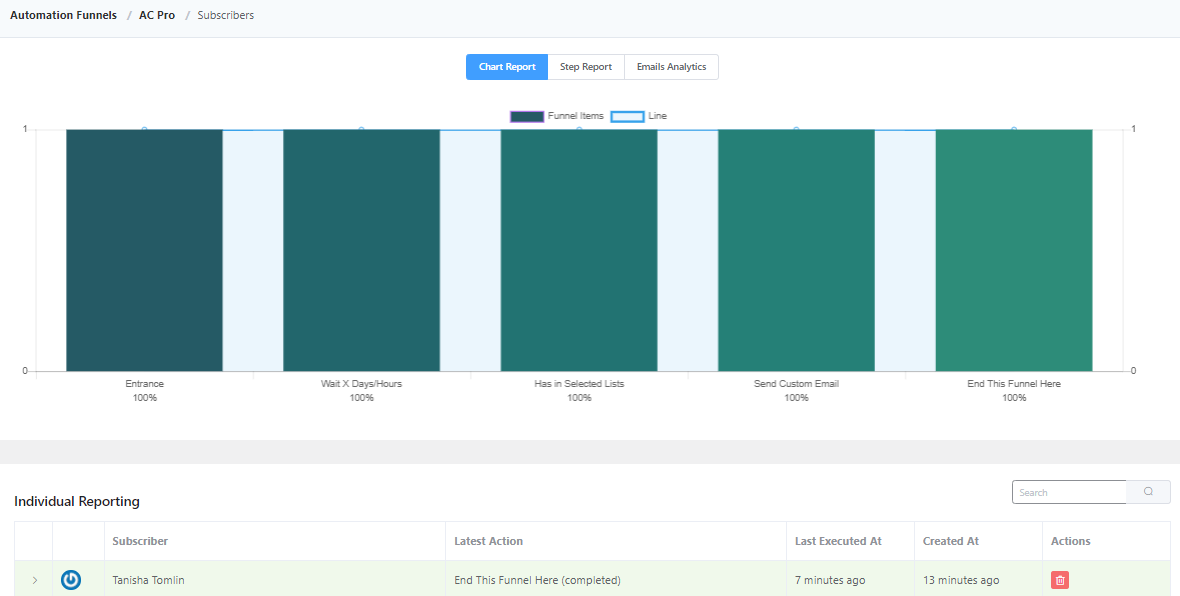
According to the report, the email was sent to the customer. This means that after the wait time, the customer did not complete their order and that’s why further action took place based on the Automation set up.
The reminder email that the customer received looked like this:
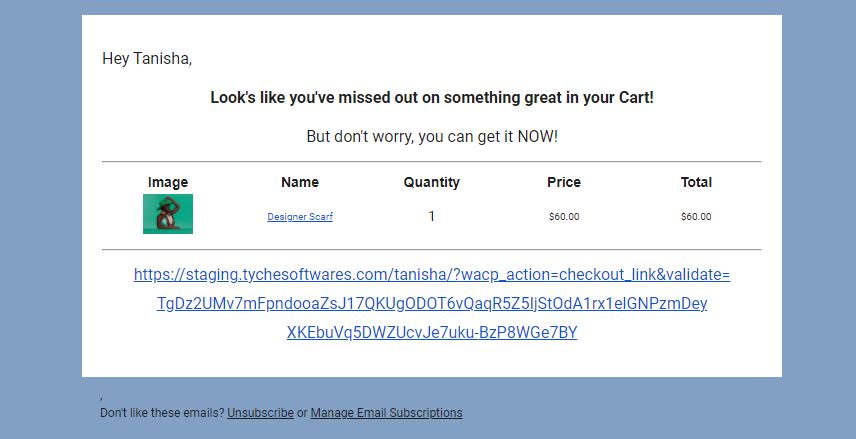
To conclude, with FluentCRM you’ll be able to send customised reminder emails from this integration.