Table of Contents
When you are working with WooCommerce and want to add some extra information to your product page, you can do this by adding custom fields to the products. These custom fields are also referred to as item meta and can be displayed on the cart page, checkout page, and emails too. Cart item meta is when extra product fields are added to the products in the cart. And order item meta is when that information is saved for the order.
In this post, we will see how to add a cart & order item meta for WooCommerce. We can add the item meta in just simple 4 steps.
5 Steps to adding custom fields to WooCommerce products & subsequently through the order cycle
- Add custom data fields to the WooCommerce Product page
- Add custom data to the WooCommerce cart item meta
- Display custom data on the WooCommerce cart and checkout page
- Add custom data to the WooCommerce order item meta
- Add custom data fields based on the Product Category to the Product Page
1. How to add custom data fields to the WooCommerce Product page
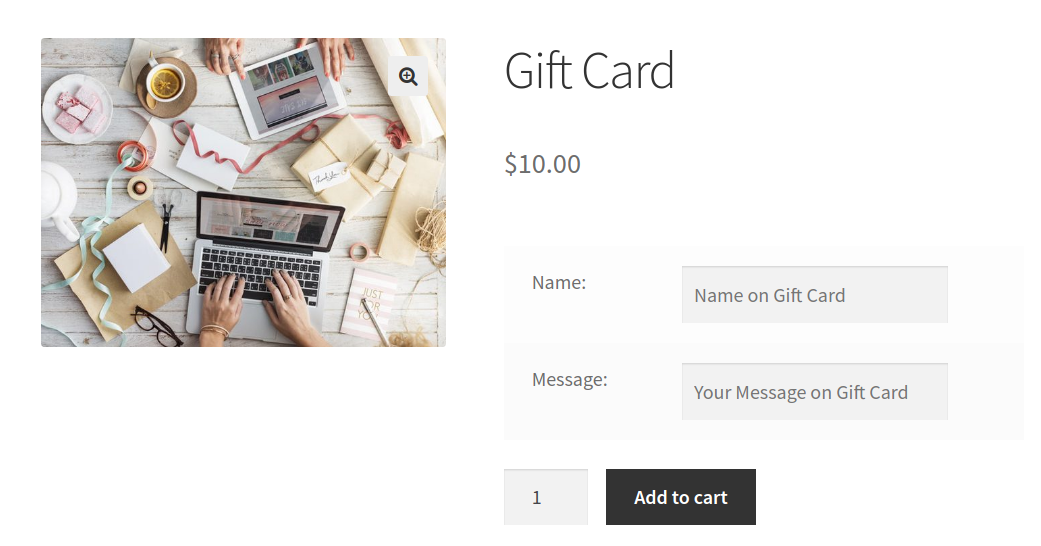
I need 2 fields as custom data on my cart and checkout page. I have added the Name & Message fields on my Product page. We will add these fields data as Cart Item meta and Order Item meta so it will be displayed throughout the order cycle.
To add these fields I have used WooCommerce action hook woocommerce_before_add_to_cart_button. This action hook allows you to add custom content before the Add to Cart button on the product page.
You can add custom fields using the action as shown below:
<?php
add_action( 'woocommerce_before_add_to_cart_button', 'add_fields_before_add_to_cart' );

function add_fields_before_add_to_cart( ) {
	?>
	<table>
		<tr>
			<td>
				<?php _e( "Name:", "aoim"); ?>
			</td>
			<td>
				<input type = "text" name = "customer_name" id = "customer_name" placeholder = "Name on Gift Card">
			</td>
		</tr>
		<tr>
			<td>
				<?php _e( "Message:", "aoim"); ?>
			</td>
			<td>
				<input type = "text" name = "customer_message" id = "customer_message" placeholder = "Your Message on Gift Card">
			</td>
		</tr>
	</table>
	<?php
}
In my example, I have used a simple product type named “Gift Card”. Once you have added the code snippet, you will have 2 fields on the WooCommerce product page. You can replace it with any other type of field as you need.
2. Add custom data to the WooCommerce cart item meta
Now, we want the data of these fields to be added to their respective cart item. To add these data we will use WooCommerce filter woocommerce_add_cart_item_data. This filter allows us to add the custom data to the cart item meta.
Let’s see how to add the custom data to the cart item data.
add_filter( 'woocommerce_add_cart_item_data', 'add_cart_item_data', 25, 2 );

function add_cart_item_data( $cart_item_meta, $product_id ) {

	if ( isset( $_POST ['customer_name'] ) && isset( $_POST ['customer_message'] ) ) {
		$custom_data  = array() ;
		$custom_data [ 'customer_name' ]    = isset( $_POST ['customer_name'] ) ?  sanitize_text_field ( $_POST ['customer_name'] ) : "" ;
		$custom_data [ 'customer_message' ] = isset( $_POST ['customer_message'] ) ? sanitize_text_field ( $_POST ['customer_message'] ): "" ;

		$cart_item_meta ['custom_data']     = $custom_data ;
	}

	return $cart_item_meta;
}
This filter will be called when you will click on the Add to Cart button on the product page. In my example, you can check that I have created 1 array called “$custom_data”, in this array I will add my data. I will add the data from $_POST array, which will contain array keys as ‘customer_name’ & ‘customer_message’.
The above code snippet will add the custom data to your cart item. This data will be useful in our next step where we want to display the data on the cart page & checkout page.
3. Display custom data on WooCommerce cart and checkout page
Now, we want custom data to be displayed to the customers. To display that custom data we will use WooCommerce filter woocommerce_get_item_data.
Let’s see how we can display the custom data on the cart and checkout page.
add_filter( 'woocommerce_get_item_data', 'get_item_data' , 25, 2 );

function get_item_data ( $other_data, $cart_item ) {

	if ( isset( $cart_item [ 'custom_data' ] ) ) {
		$custom_data  = $cart_item [ 'custom_data' ];

		$other_data[] =   array( 'name' => 'Name',
					 'display'  => $custom_data['customer_name'] );
		$other_data[] =   array( 'name' => 'Message',
					 'display'  => $custom_data['customer_message'] );
	}

	return $other_data;
}
This filter allows you to add custom data to the cart item. In my example, you can check that I have added 2 fields and their data. I have first checked that the added item contains custom_data.
If our custom data is present for the cart item then we will add our data in an array and pass it to the $other_data array. You need to add 2 keys to the array as name & display.
name – You need to give the name of the field.
display – You need to give the value of the field.
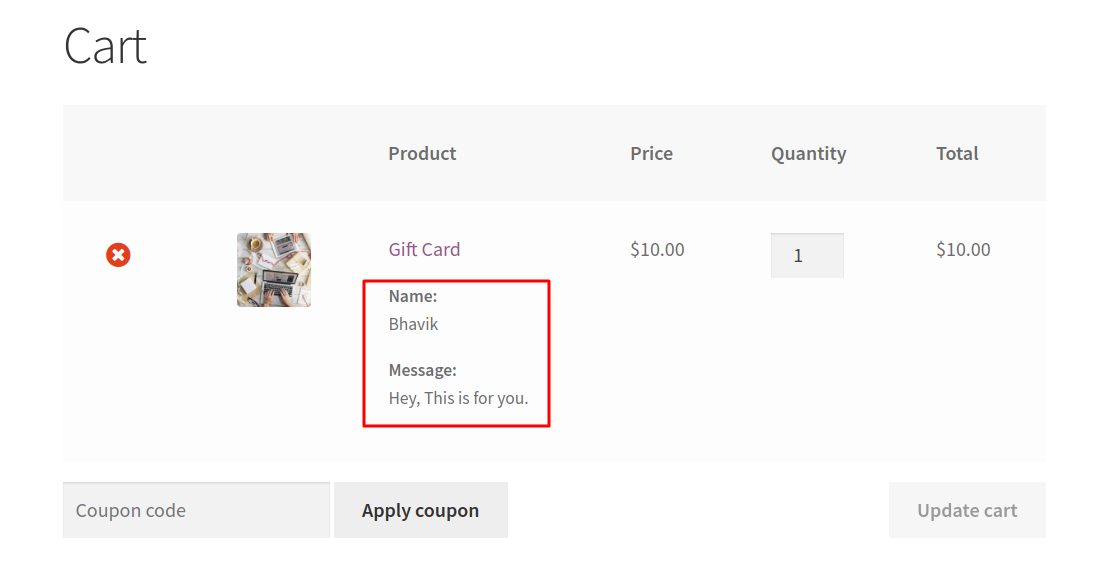
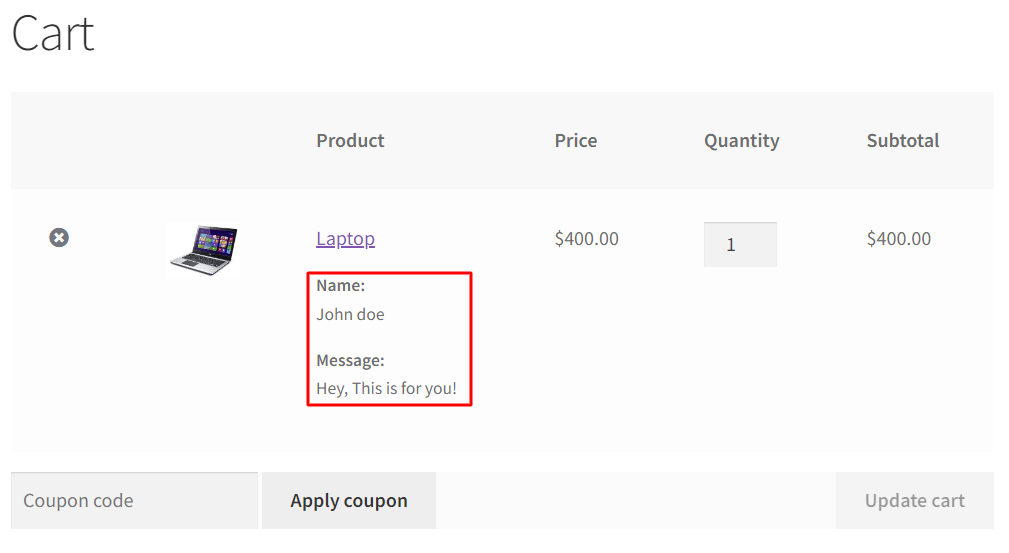
After adding the above code the Cart page will display custom data as below:
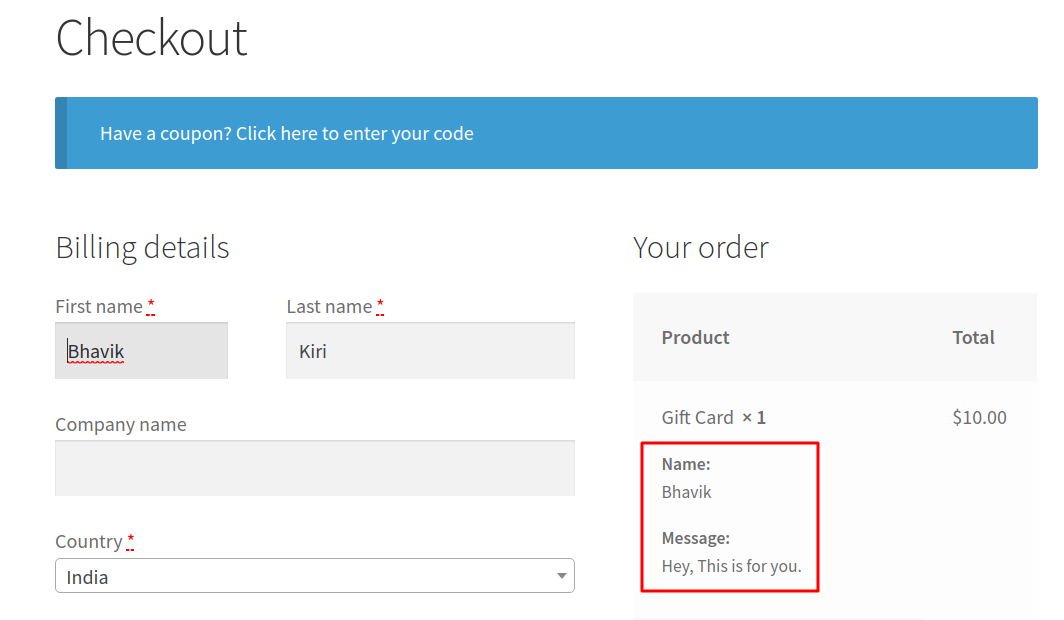
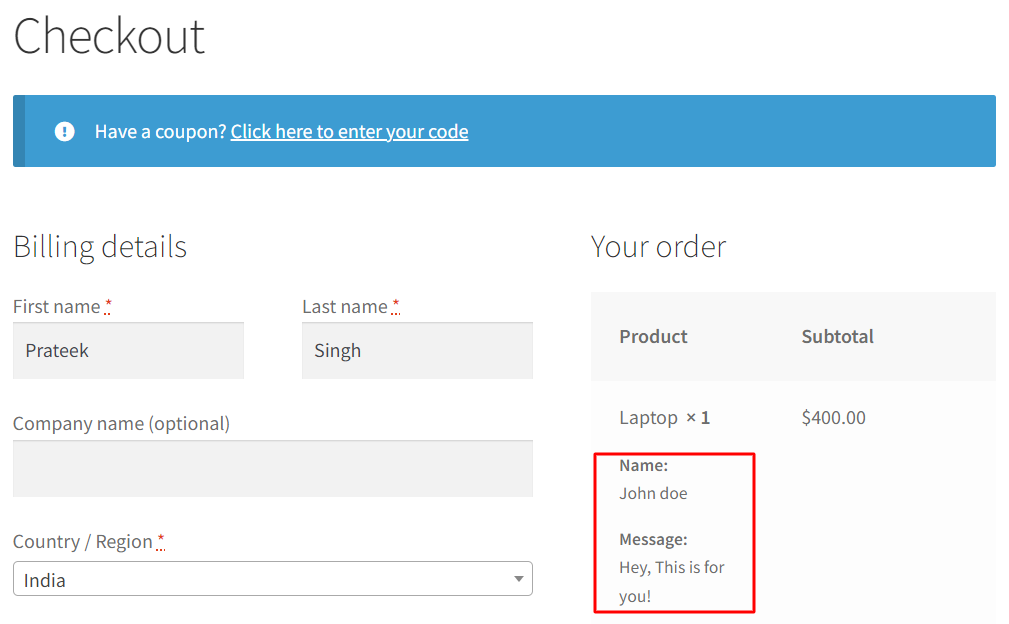
After adding the above code snippet Checkout page will display custom data as below:
4. Add custom data to the WooCommerce order item meta
So far we have seen that we have added data to the cart items. Now, let’s add these custom fields in our order item meta.
Order item meta is the extra information displayed for every item of the order. If you don’t add your extra information in the order item meta, then it won’t be shown in emails, on the order received page, and on the edit order page.
To add it to the order item meta we will use WooCommerce action hook woocommerce_add_order_item_meta.
This action hook provides you with 2 parameters as $item_id, and $values. Using these two parameters we will add the order item meta. This action will be called when you click on the Place order button on the Checkout page.
add_action( 'woocommerce_add_order_item_meta', 'add_order_item_meta' , 10, 2);

function add_order_item_meta ( $item_id, $values ) {

	if ( isset( $values [ 'custom_data' ] ) ) {

		$custom_data  = $values [ 'custom_data' ];
		wc_add_order_item_meta( $item_id, 'Name', $custom_data['customer_name'] );
		wc_add_order_item_meta( $item_id, 'Message', $custom_data['customer_message'] );
	}
}
In my example, I have checked if the $values array contains our custom data. If it contains then we will add our order item meta using wc_add_order_item_meta.
In function wc_add_order_item_meta you need to pass 3 parameters.
- Item id
- Name/Key of the item meta
- Value of the item meta
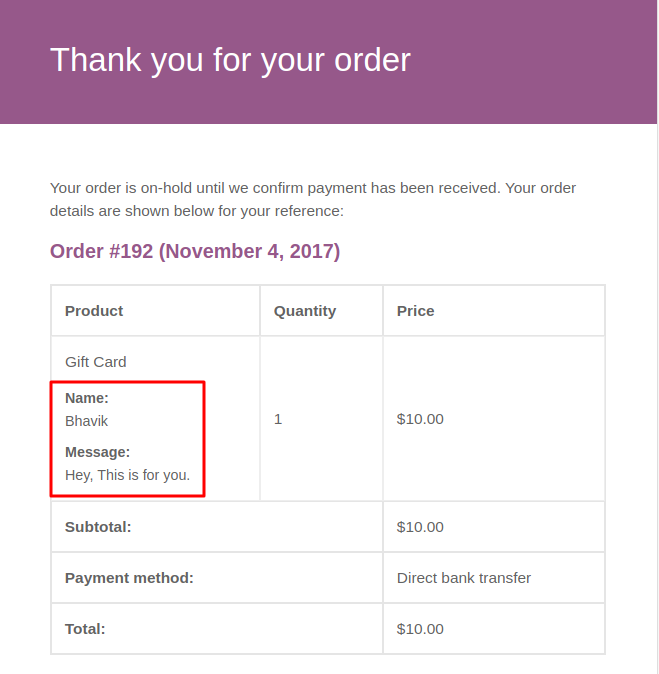
After adding the above code, it will display the custom field data (order item meta) in the email, order received page & edit order page on the admin side.
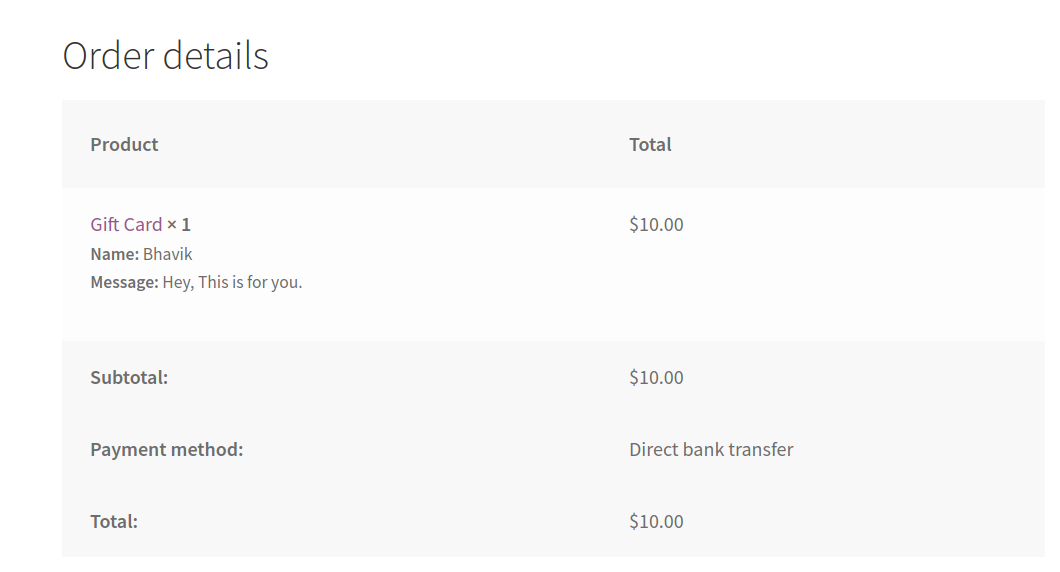
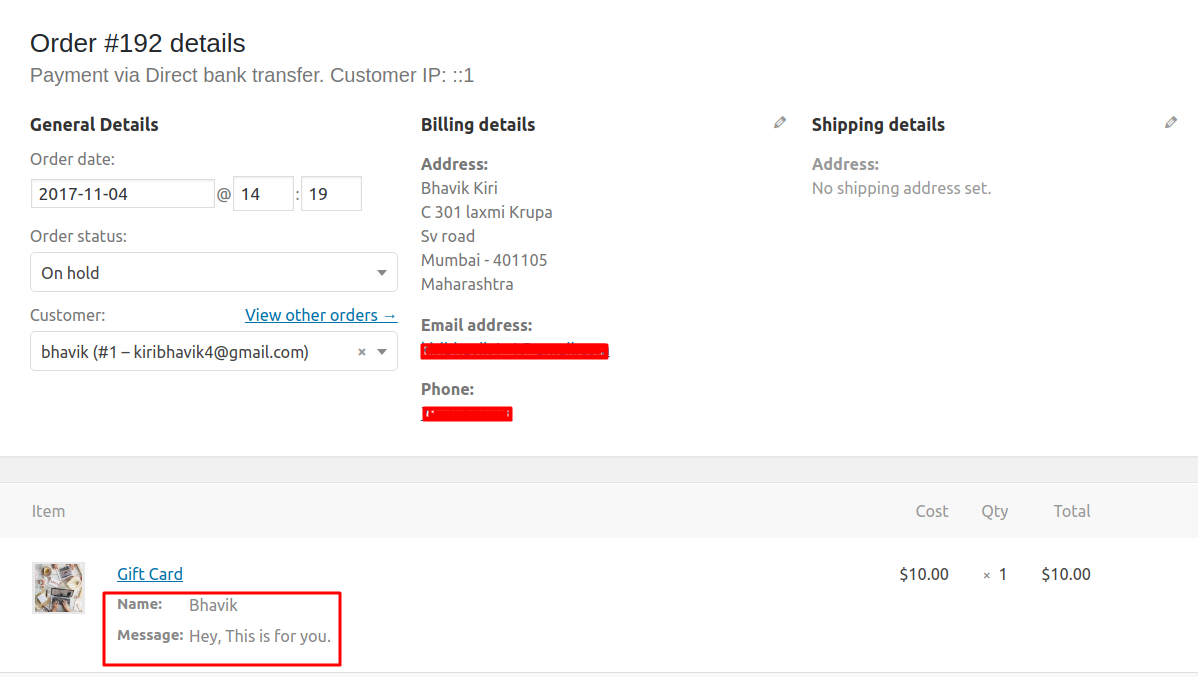
Here is the full code snippet of all the above modules.
<?php

add_action( 'woocommerce_before_add_to_cart_button', 'add_fields_before_add_to_cart' );

function add_fields_before_add_to_cart( ) {
	?>
	<table>
		<tr>
			<td>
				<?php _e( "Name:", "aoim"); ?>
			</td>
			<td>
				<input type = "text" name = "customer_name" id = "customer_name" placeholder = "Name on Gift Card">
			</td>
		</tr>
		<tr>
			<td>
				<?php _e( "Message:", "aoim"); ?>
			</td>
			<td>
				<input type = "text" name = "customer_message" id = "customer_message" placeholder = "Your Message on Gift Card">
			</td>
		</tr>
	</table>
	<?php
}


/**
 * Add data to cart item
 */
add_filter( 'woocommerce_add_cart_item_data', 'add_cart_item_data', 25, 2 );

function add_cart_item_data( $cart_item_meta, $product_id ) {

	if ( isset( $_POST ['customer_name'] ) && isset( $_POST ['customer_message'] ) ) {
		$custom_data  = array() ;
		$custom_data [ 'customer_name' ]    = isset( $_POST ['customer_name'] ) ?  sanitize_text_field ( $_POST ['customer_name'] ) : "" ;
		$custom_data [ 'customer_message' ] = isset( $_POST ['customer_message'] ) ? sanitize_text_field ( $_POST ['customer_message'] ): "" ;

		$cart_item_meta ['custom_data']     = $custom_data ;
	}

	return $cart_item_meta;
}

/**
 * Display the custom data on cart and checkout page
 */
add_filter( 'woocommerce_get_item_data', 'get_item_data' , 25, 2 );

function get_item_data ( $other_data, $cart_item ) {

	if ( isset( $cart_item [ 'custom_data' ] ) ) {
		$custom_data  = $cart_item [ 'custom_data' ];

		$other_data[] =   array( 'name' => 'Name',
					 'display'  => $custom_data['customer_name'] );
		$other_data[] =   array( 'name' => 'Message',
					 'display'  => $custom_data['customer_message'] );
	}

	return $other_data;
}

/**
 * Add order item meta
 */

add_action( 'woocommerce_add_order_item_meta', 'add_order_item_meta' , 10, 2);

function add_order_item_meta ( $item_id, $values ) {

	if ( isset( $values [ 'custom_data' ] ) ) {

		$custom_data  = $values [ 'custom_data' ];
		wc_add_order_item_meta( $item_id, 'Name', $custom_data['customer_name'] );
		wc_add_order_item_meta( $item_id, 'Message', $custom_data['customer_message'] );
	}
}
For 2 of our plugins, we have added custom fields to the WooCommerce product page. That’s where the idea for writing this post came from.
The Booking plugin for WooCommerce adds two meta fields: Booking date and booking time or Booking start date and booking end date.
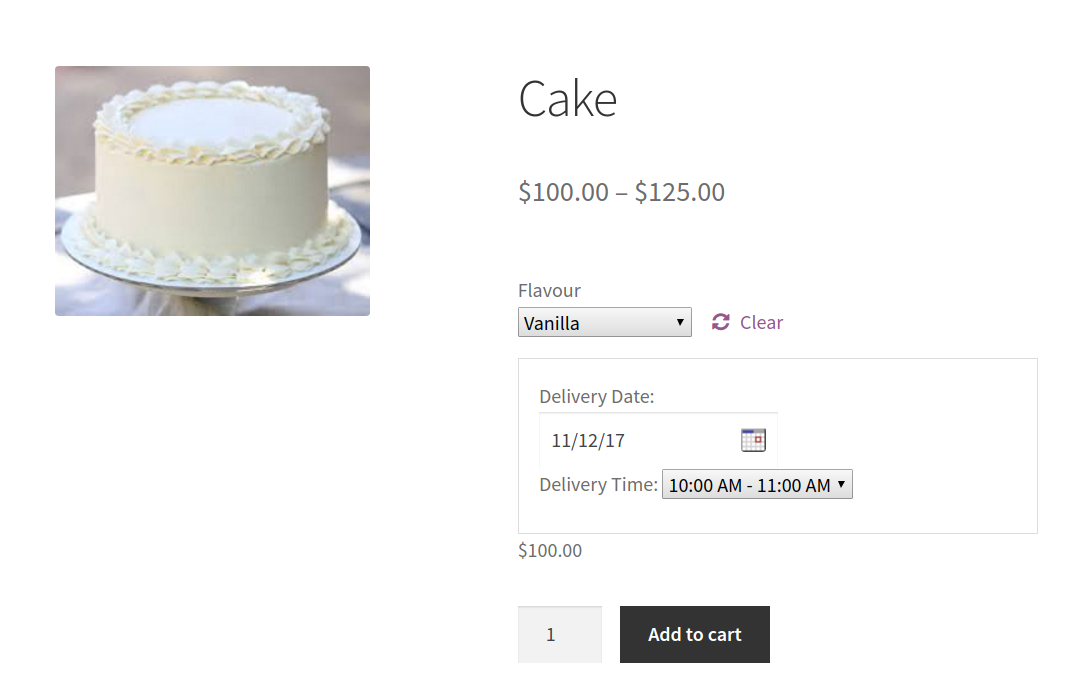
The Product Delivery Date Pro for WooCommerce plugin adds two fields – Delivery Date & Delivery Time.
5. Add custom data fields based on the Product Category to the Product page
The below code snippet adds custom input fields to the product page and stores the data entered into these fields when a specific product with a particular category is added to the cart.
This will add custom input fields to the product page for products in the “electronic-device” category. When customers add such products to their cart, the custom data (customer name and message) will be stored in the cart item. This data can be used to display the customer’s name and message in the cart, order, or email notifications.
// Add custom input fields to the product page for a specific product ID and category
function ts_add_fields_before_add_to_cart() {
    global $product;

    // Check if the product is in a specific category (replace 'your-category-slug' with your actual category slug)
    if (has_term('electronic-device', 'product_cat', $product->get_id())) {
        ?>
        <table>
            <tr>
                <td><?php _e("Name:", "aoim"); ?></td>
                <td><input type="text" name="customer_name" id="customer_name" placeholder="Name on Gift Tag"></td>
            </tr>
            <tr>
                <td><?php _e("Message:", "aoim"); ?></td>
                <td><input type="text" name="customer_message" id="customer_message" placeholder="Your Message on Gift Tag"></td>
            </tr>
        </table>
        <?php
    }
}
add_action('woocommerce_before_add_to_cart_button', 'ts_add_fields_before_add_to_cart');

// Add data to cart item for a specific product ID and category
function ts_add_cart_item_data($cart_item_data, $product_id) {
    global $product;

    // Check if the product is in a specific category (replace 'your-category-slug' with your actual category slug)
    if (has_term('electronic-device', 'product_cat', $product_id)) {
        if (isset($_POST['customer_name']) && isset($_POST['customer_message'])) {
            $custom_data = array();
            $custom_data['customer_name'] = isset($_POST['customer_name']) ? sanitize_text_field($_POST['customer_name']) : "";
            $custom_data['customer_message'] = isset($_POST['customer_message']) ? sanitize_text_field($_POST['customer_message']) : "";

            $cart_item_data['custom_data'] = $custom_data;
        }
    }
    return $cart_item_data;
}
add_filter('woocommerce_add_cart_item_data', 'ts_add_cart_item_data', 25, 2);
When the customer views the product page for a laptop (an electronic device), the custom input fields for electronic devices will be displayed.
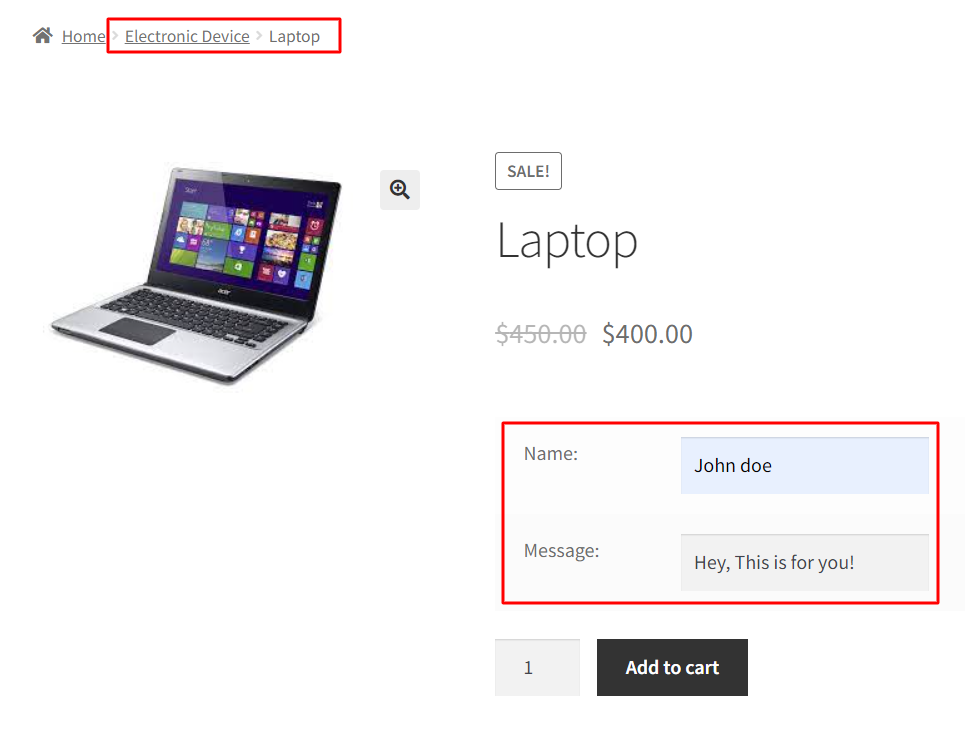
After clicking the Add to Cart button, the custom data value will be displayed on the cart and checkout pages with the name and message.
Here is the explanation of the code step-by-step:
- ts_add_fields_before_add_to_cart function:
- This function is used to add custom input fields to the product page. It is hooked to the woocommerce_before_add_to_cart_button action, which means it will be executed just before the “Add to Cart” button on the product page.
- global $product
;:- This line makes the global $product variable available within the function. The $product variable represents the currently displayed product.
- Conditional Check:
- The code checks if the current product is in a specific category. It uses the has_term function to check if the product has the category with the slug ‘electronic-device’ (you should replace this with the actual category slug you want to target).
- If the product is in the specified category:
- It displays a table with two rows, each containing a label and an input field for the customer’s name and message. These input fields are added using HTML, and the <?php _e(“Name:”, “aoim”); ?> syntax is used for translating text (localization).
- ts_add_cart_item_data function:
- This function is hooked to the woocommerce_add_cart_item_data filter, which allows you to modify the cart item data when a product is added to the cart.
- Conditional Check:
- Similar to the previous function, this code checks if the product is added to the cart has the ‘electronic-device’ category.
- If the product is in the specified category:
- It checks if the customer_name and customer_message values are set in the $_POST data. These values are expected to be sent when the user submits the form on the product page.
- If the values are set:
- It creates an array called $custom_data to store the customer’s name and message. It sanitizes and stores the values from the $_POST data in this array sanitize_text_field() to ensure data integrity.
- It then adds this $custom_data array to the cart item data by assigning it to $cart_item_data[‘custom_data’].
- Finally, it returns the modified cart item data.
Have you ever tried doing this? What has your experience been? Let me know in the comments.


Hello, can you help?
We are not seeing the code snippets.
Hi,
Where is the full snippet of code for the example above?
Hello Vishal Kothari, Can you share the code, please?
Hi, great job…but I have a request… My client want to update a custom delivery services (field that fill on the booking product) on the checkout page after booking. I mean, on the booking calendar whit the hook “before_booking…” I place this field called “location_of_services” if the user is not logged in, but if the user is logged in this custom field filled automatically with their own “location_of_services” postcode added to their account details. So after booking, on the checkout page, if the user wants to change de “delivery of services” they have to fill the “shipping_postcode”, and if the… Read more »
Could you please tell me how you can apply this code to a specific product category?