In the previous post, we discussed how to create new custom order statuses using Custom Order Status for WooCommerce Pro plugin. Once the custom statuses have been created, you can set up emails that will be triggered when the order status changes to custom status. Email notification is sent to the customer and/or admin in order to confirm the order status change to them.
Email notifications can be set in two ways-
2) at the Custom Order Status level.
The difference between the Global Email template and the Custom Email template is that, in the Global template, multiple statuses can be selected. Also, the email is sent to the customer & admin with the same email template when the status is changed to the custom order status. Whereas, for the Custom Email template, it is possible to change the content for each individual custom status.
Global-level Email Notifications setup
First, we will learn how to configure Email notifications at the Global level. We will learn about the process of composing and sending an email notification when the order status changes to a custom order status. It is the most critical section, as you can notify the customers/admin of their order status change by enabling the settings in this section. Please note that along with setting up the email notifications at a global level, you can also set them up at a custom level. Simply scroll down to find the ‘Custom Order Status level Email Notifications setup’ section.
Sending Email Notifications
These email notifications can be set under WooCommerce -> Settings-> Custom Order Status -> Order Status Emails.
Default settings for the Email section are displayed as shown below: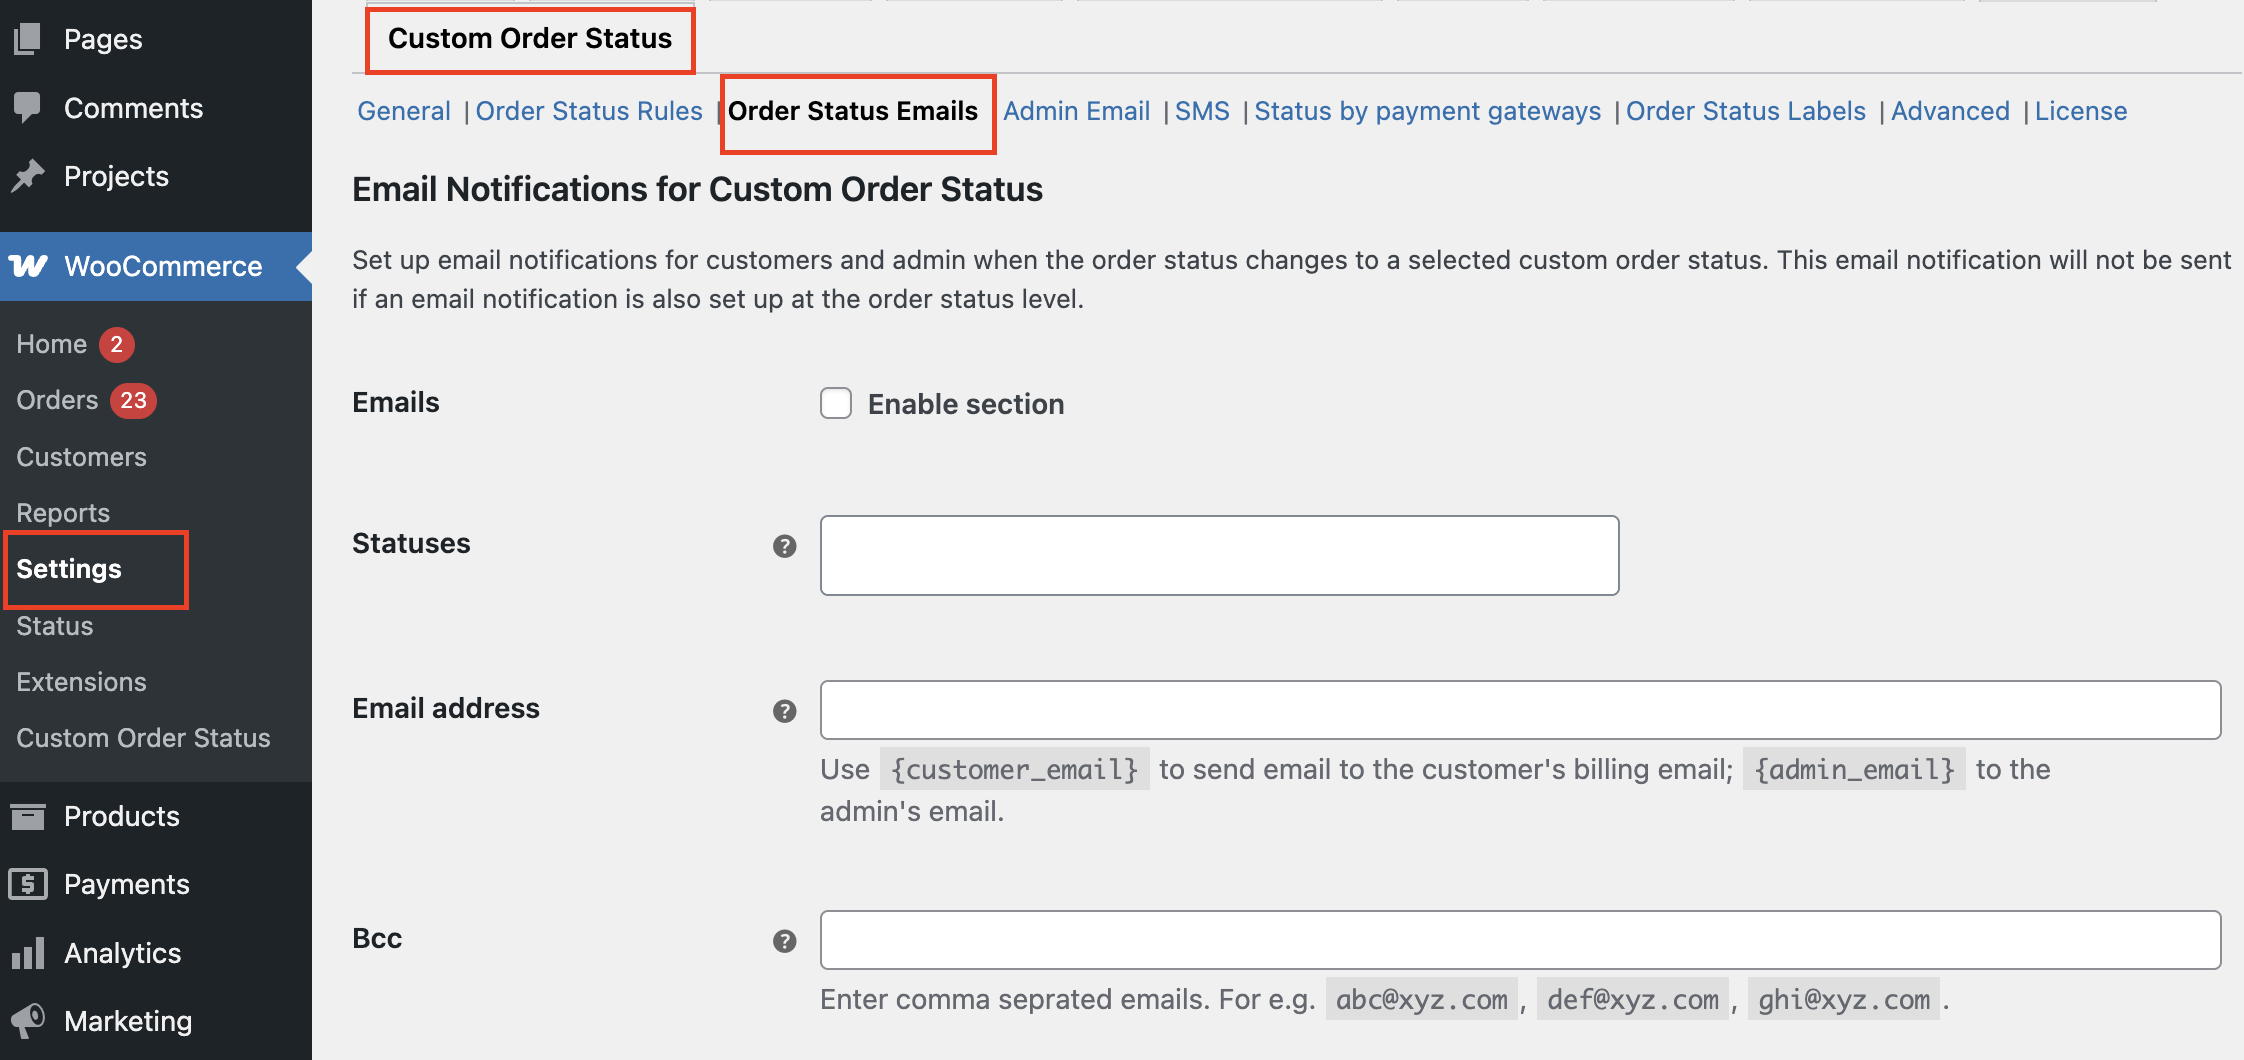


Default Emails Options section
On this page, you will find 2 sections, Email Notification for Custom Order Status and Reset Settings.
Email Options
These settings are required for sending an email notification when order status changes to selected custom status.
Let us understand each of these settings in detail:
- Emails: Tick this checkbox to enable sending email notifications for custom statuses.
- Statuses: In this setting, you will find a dropdown of custom order statuses. Select one or more statuses for which this email notification will be sent. If you leave it blank, then emails will be sent for all custom order statuses.
- Email address: Over here, you can choose the email address to which this email notification will be sent. You can either send email notifications to customers and/or admin. For customers, you can enter {customer_email} in the field, and this email notification will be sent to the customer’s billing email. Similarly, you can enter {admin_email} in the field, and the email notification will be sent to the admin’s email address. If you leave this blank, the email will be sent to the admin.
- Bcc: Maintain the privacy of email addresses by using this section. This is the space where you can enter a Blind Carbon Copy of the email to an address. The email will be sent to the addresses inserted here, however, the original email addresses will not be able to see these email addresses.
- Email subject: You can enter the subject of the email here. You can fill this field with shortcodes as well, which will replace the actual values in the email. Shortcodes such as {order_id}, {order_number}, {order_date}, {site_title}, {status_to} etc, are available that can be used for the email subject.
- Email heading: The text entered in this field will be displayed as a heading of the email. For email heading as well, you can use these shortcodes, which will get replaced by the actual values. Please make sure that the ‘Heading’ is self-explanatory and easily understandable by the customer/admin.
- Email content: You can enter the details here that you wish to highlight in the email notification sent to the customer/admin using shortcodes. It can contain order details, order status, changed status, date and time, etc.
Reset Settings
This setting is used to reset the Email Options settings to the default values. You can reset these settings by ticking the Reset section settings checkbox and clicking the Save changes button.
Now that we are aware of what each setting does, let’s consider an instance to understand the process of sending email notifications in depth.
Example
Let’s say that we have created a new order #2310 whose current status is Processing. But now, we wish to add a new custom order status – Dispatched. When the current status of this order changes to the custom status Dispatched, an email notification should be sent to the admin notifying them about this change.
The Orders page would display the details of order #2310 along with Dispatched icon under the Actions column as shown below:

New order created
Now let us add settings under the Emails section so that when the status of this order changes from Processing to custom status – Dispatched, an email notification is sent to the admin. Therefore we will go to the Emails page and add the settings as shown below:
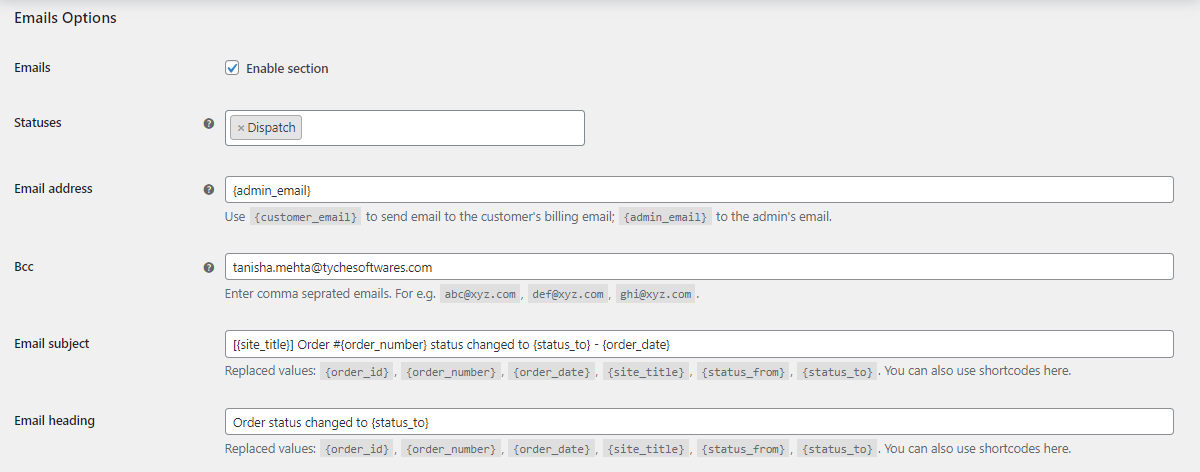

Add settings for sending email notification
As you can see above, Enable section has been ticked. Hence an email notification will be sent when the status change will take place for this order. Now select Statuses as Dispatched from the custom order status dropdown because we want this email notification to be sent out when the status changes to Dispatched.

Statuses selected as Dispatched
Now under the email address option, we enter %admin% because we want to send the email notification to the admin’s email address.
For the ‘Email subject’ we will add [{site_title}] Order #{order_number} status changed to {status_to} – {order_date} using the available shortcodes. This will display the subject on the admin’s side as [WordPress] Order #2310 status changed to dispatched – November 26, 2018.
Moreover, in the ‘Email heading’ & ‘Email contents’ of this email, we will enter Order status changed to {status_to} and Order #{order_number} status changed from {status_from} to {status_to} respectively, using the shortcodes. Therefore the email heading will read as Order status changed to dispatched and the contents of the email will show the message as Order #2310 status changed from processing to dispatched as shown below:
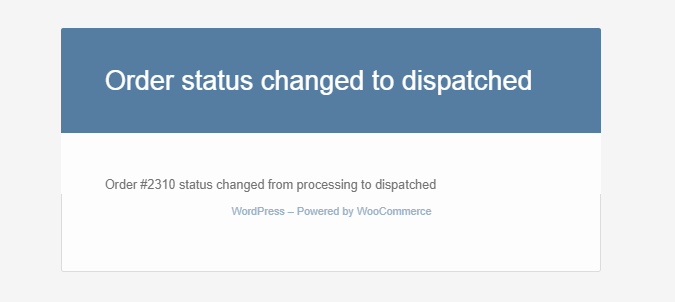
Email notification sent to admin
Note: If the Bcc section is filled, then the above email will also be sent to the email address filled there. In our case, it would be sent to the email address: [email protected]
Custom Order Status level Email Notifications setup
We already know that an Email notification is sent to the customer and/or admin to confirm the order status change. Now, we will see how to create different email templates for different custom order statuses. That means we can create different email templates for any custom status which is created and send the email to the customer or admin using that template.
Please note that along with setting up the email notifications at the custom status level, you can even set them up at the Global level as discussed earlier.
Creating an email template:
To create an email template, go to WooCommerce -> Custom Order Status -> Add New. Here’s how the default page will appear:

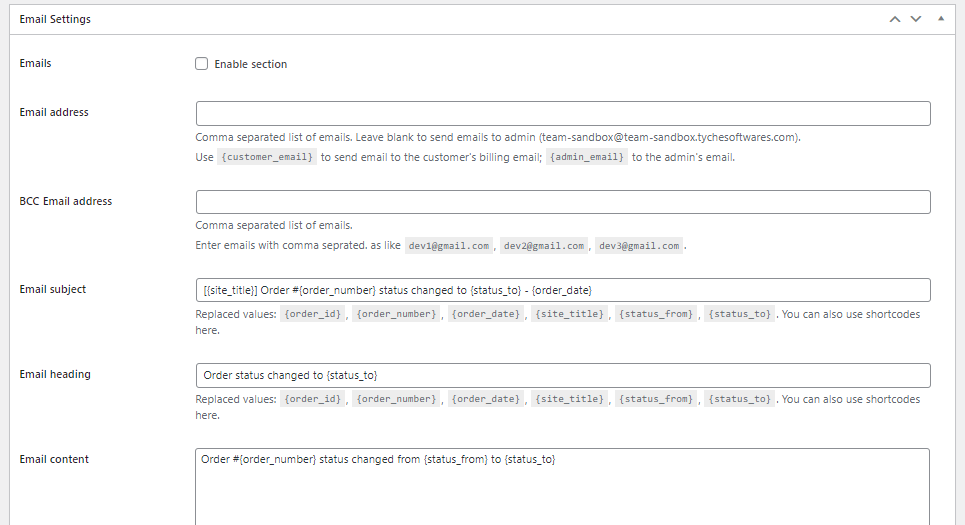
Let’s say that you wish to create an Email template for a Custom Order Status called ‘Dispatched.’ Click on the ‘Add title’ field and enter ‘Dispatch.’ Here’s how the other details can be filled in for the Email template:
1. Status details
We have already covered what these options mean and how you can fill them. Please click here to read them again.

2. Email Setting
In order to configure the email settings, you can simply scroll above and read them again. As a reference, we have filled it up according to a ‘Dispatch’ custom order status as shown below:
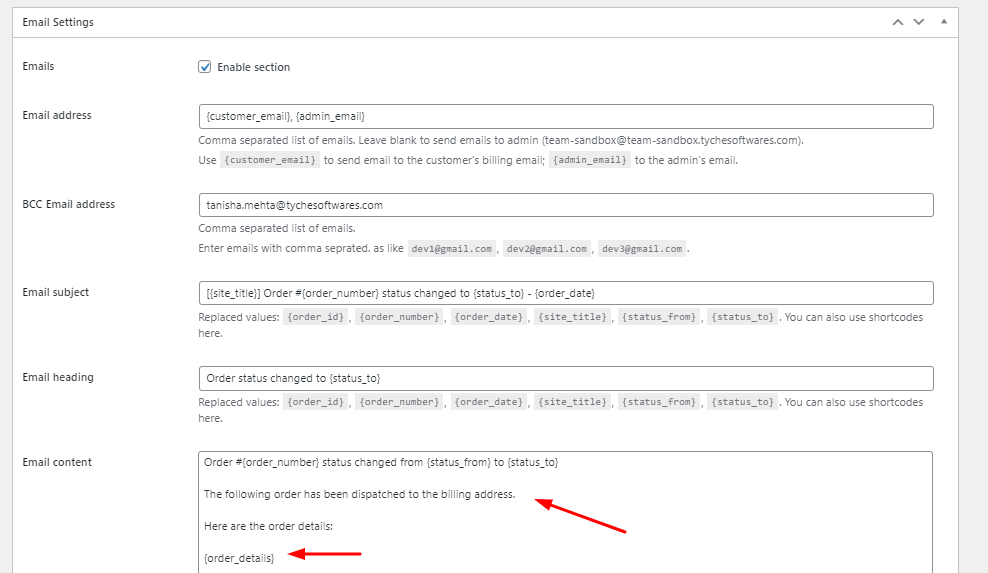
In the above screenshot, for ‘Email content’ we have added
‘The following order has been dispatched to the billing address,
Here are the {order_details}:’
So, after changing the order status to dispatch from the Orders page, the email will be received by the customer, admin and the address inserted into the Bcc section which will include the content entered in the email content section.
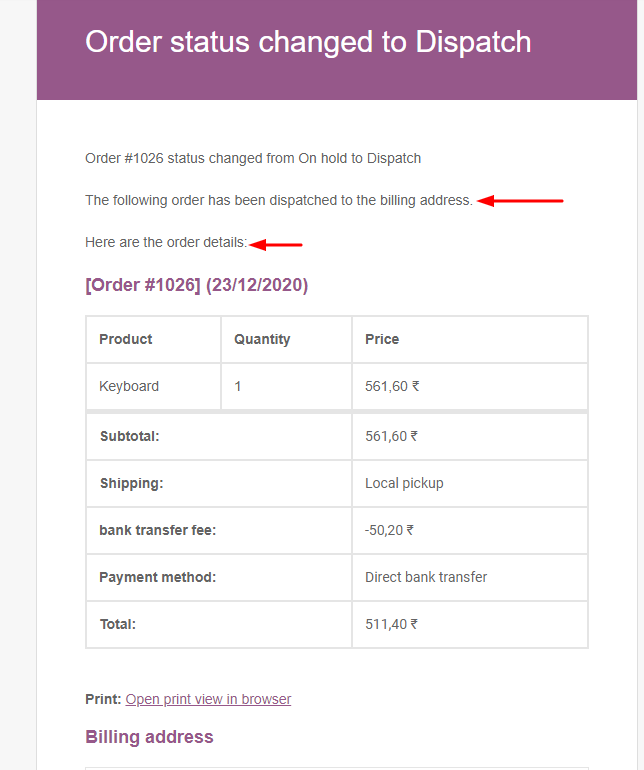
Similarly, we can add any content in the email template for any custom statuses to show in the email received by the customer or admin.
Conclusion
This is how, with Custom Order Status for WooCommerce plugin, you can send an email to your customers notifying them about the change in the status of their order.