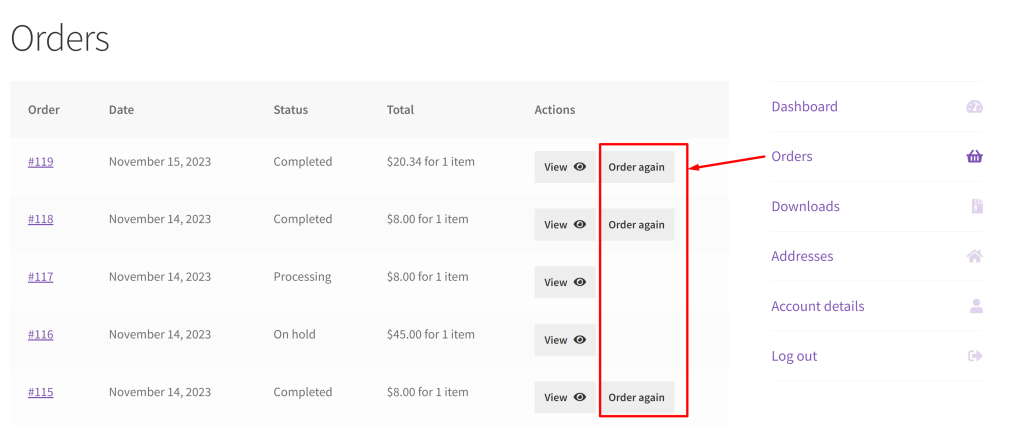
When customers are looking to repurchase a product that they have bought in the past, they don’t need to search the entire website. They can easily reorder such items from your online store with a click of an “Order again” button. By default, WooCommerce has placed this button on the My Account >Orders >View Order page.
Now, we can enhance the visibility of this button by altering the default placement. Placing the “Order Again” button directly in the “Actions” column on the “My Orders” page helps customers to quickly identify and use the button without navigating to the individual order details and reducing the number of clicks required.
This post will help you to add an ‘Order again’ button in WooCommerce on the My Account >Orders Page.
Where to Add Custom Code in WooCommerce?
It is advisable to add the code snippets to the functions.php file of your child theme. Access the file directly from Appearance->Theme File Editor->Locating the child theme’s functions.php from the right sidebar. You can also access it from your theme’s directory file. Insert the following code snippet in functions.php. The alternative & easy option is to install & activate the Code Snippets plugin. You can then add the code as a new snippet via the plugin.
Solution: Add an ‘Order Again’ Button in WooCommerce on My Account > Orders Page
Imagine an online store that sells ‘Pet food’ items. As such items are always purchased on a monthly basis, the customer can easily repurchase such items using the order again button. The below-given code snippet will display the order gain button directly on the ‘Actions’ column of the orders page and only for the order status ‘completed’. The status can be changed according to your need for all statuses or anything else.
add_filter( 'woocommerce_my_account_my_orders_actions', 'ts_order_again_action', 9999, 2 );

function ts_order_again_action( $actions, $order ) {
    if ( $order->has_status( 'completed' ) ) {
        $actions['order-again'] = array(
            'url' => wp_nonce_url( add_query_arg( 'order_again', $order->get_id(), wc_get_cart_url() ), 'woocommerce-order_again' ),
            'name' => __( 'Order again', 'woocommerce' ),
        );
    }
    return $actions;
}
Output
The output shows that the order again button is placed on the actions column only for the products that have the order status ‘completed’.

Code Explanation
Hook into the filter:
- The add_filter function is used to add a filter to the woocommerce_my_account_my_orders_actions hook.
- It specifies the function ts_order_again_action as the callback for the filter.
Define the filter function ‘ts_order_again_action’:
- This function is called when the woocommerce_my_account_my_orders_actions hook is triggered.
- It takes two parameters: $actions (an array representing existing order actions) and $order (the WooCommerce order object).
Check if the order status is ‘completed’:
- The if statement checks if the order status of the given $order is ‘completed’.
Add an ‘Order Again’ action if the order is completed:
- If the order is completed, a new action with the key ‘order-again’ is added to the $actions array.
- The action array has two properties:
- ‘url‘: A secure URL generated using wp_nonce_url. It includes the order ID in the query string and redirects to the cart page.
- ‘name’: The display name for the action, set to ‘Order again’ using the __(‘Order again’, ‘woocommerce’ ) function.
Return the modified actions array:
- The modified $actions array, which now includes the ‘Order Again’ action for completed orders, is returned.
Conclusion
The above code snippet helps you to simply add a button to one of the columns on the My Account > Orders Page for completed orders. You can also enhance this table by adding a new column and get the product name in WooCommerce on the My Account -> Orders page.


