Table of Contents
In WooCommerce, customizing the checkout process to include additional fees based on custom radio buttons can be a valuable feature for online store owners. Using this feature you can give the customers to select specialized services like special delivery, gift wrapping, or handling fees, and automatically apply corresponding fees to their order total. If you are looking to charge extra fees based on certain options on the WooCommerce checkout page, then this post will help you.
If you want to add fees or discounts for different payment gateways, check out our post on adding discounts for payment methods in WooCommerce.
Where to add Custom Code in WooCommerce?
It is advisable to add the code snippets to the functions.php file of your child theme. Access the file directly from Appearance->Theme File Editor->Locating the child theme’s functions.php from the right sidebar. You can also access it from your theme’s directory file. Insert the following code snippet in functions.php. The alternative & easy option is to install the Code Snippets plugin. You can then add the code as a new snippet via the plugin.
Solution: Adding WooCommerce Checkout Fees Based on Custom Radio Button
Below is the code snippet that allows you to add a custom radio button during the WooCommerce checkout process.
// Add a custom radio button field before payment section
add_action('woocommerce_review_order_before_payment', 'ts_checkout_radio_choice');

function ts_checkout_radio_choice() {
   $chosen = WC()->session->get('radio_chosen');
   $chosen = empty($chosen) ? WC()->checkout->get_value('radio_choice') : $chosen;
   $chosen = empty($chosen) ? 'none' : $chosen;
   $args = array(
      'type' => 'radio',
      'class' => array('form-row-wide', 'update_totals_on_change'),
      'options' => array(
         'none' => 'None',
         'shipping_insurance' => 'Add Shipping Insurance',
         'rush_handling' => 'Rush Handling',
      ),
      'default' => $chosen
   );
   echo '<div id="checkout-radio">';
   echo '<h3>Protect your order!</h3>';
   woocommerce_form_field('radio_choice', $args, $chosen);
   echo '</div>';
}

// Calculate and add a custom fee based on the selected option
add_action('woocommerce_cart_calculate_fees','ts_checkout_radio_choice_fee', 20, 1);
function ts_checkout_radio_choice_fee($cart) {
   if (is_admin() && !defined('DOING_AJAX')) return;
   $selected_option = WC()->session->get('radio_chosen');

   if ($selected_option) {
      $extra_fee = 0;
      switch ($selected_option) {
         case 'shipping_insurance':
            $extra_fee = 4.99;
            break;
         case 'rush_handling':
            $extra_fee = 3.99;
            break;
         default:
	     $extra_fee = 0;
            break;
         // Add more cases if needed for other options
      }

      if ($extra_fee > 0) {
         $cart->add_fee('Extras', $extra_fee);
      }
   }
}

// Set the selected option in the session when the order review is updated
add_action('woocommerce_checkout_update_order_review', 'ts_checkout_radio_choice_set_session');
function ts_checkout_radio_choice_set_session($posted_data) {
   parse_str($posted_data, $output);

   if (isset($output['radio_choice'])) {
      WC()->session->set('radio_chosen', $output['radio_choice']);
   }
}
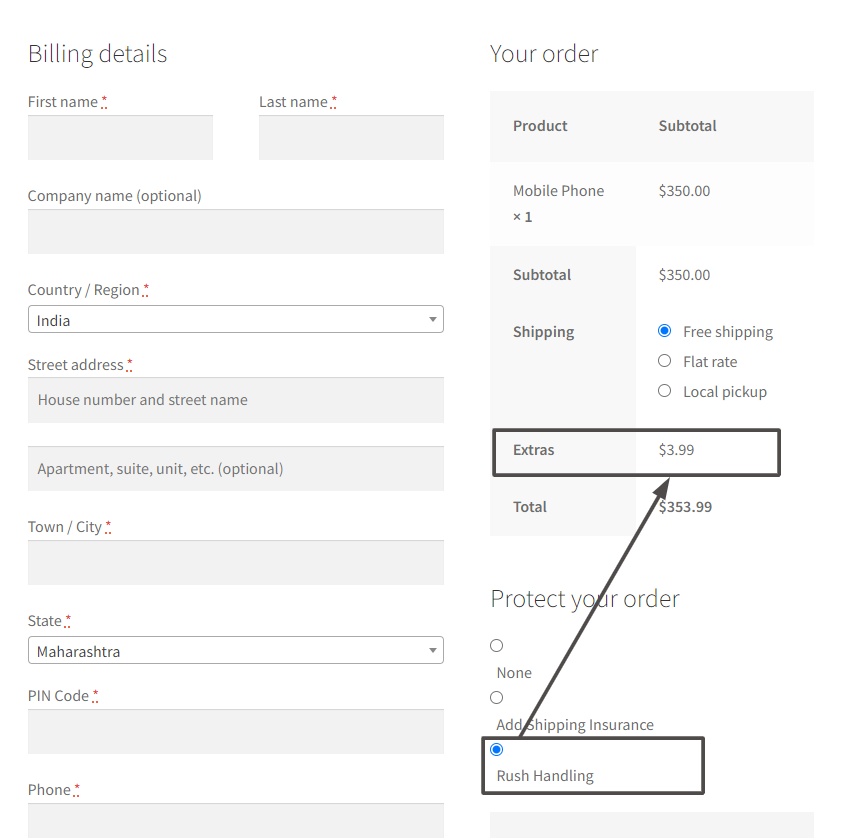
Code Output:
Here, in this figure, Mobile Phone is the product name that is added to the cart, and the store can provide the options for sending the product by charging some extra amount for shipping insurance, rush handling, etc. to increase the average order value.


Easily Set Fees & Discounts For Payment Gateways
Finding it difficult to manage all payment gateway fees and adjusting your product pricing accordingly?
The Payment Gateway Based Fees & Discounts plugin is designed to set up fees & discounts for each of your payment modes and simplify your payment process.
Code Explanation:
- The ts_checkout_radio_choice() function generates the radio button field with three options: “None,” “Add Shipping Insurance ($4.99),” and “Rush Handling ($3.99)”
- The previously selected option is retrieved from the session, and if none is found, it uses the default value specified in the arguments.
- The selected option is displayed on the checkout page within a <div> with an ID for styling purposes.
- The ts_checkout_radio_choice_fee() function calculates and adds a custom fee based on the selected radio button option.
- It is hooked to the woocommerce_cart_calculate_fees action to modify the cart fees during the calculation process.
- The function checks if it’s not in the admin area or during an AJAX request before proceeding.
- The previously selected option is retrieved from the session using WC()->session->get(‘radio_chosen’).
- A switch statement is used to determine the custom fee based on the selected option, and additional cases can be added if needed.
- The calculated fee is added to the cart using the add_fee() method, which will be displayed in the cart and checkout.
- The ts_checkout_radio_choice_set_session() function sets the selected radio button option in the session when the order review is updated.
- It is hooked to the woocommerce_checkout_update_order_review action and the function parses the posted data (query string) to retrieve the selected option.
- If the ‘radio_choice’ field is present in the posted data, its value is stored in the session using WC()->session->set()
Related Article: How to add WooCommerce checkout fees based on shipping method & payment method?
Conclusion
Using the above code, you can add a variety of options on the Checkout page. You can even add options to allow the order to be paid partially while only accepting a deposit payment at the time of the order being placed.


