Table of Contents
Adding custom fields on WooCommerce Checkout page is one crucial step for your store to provide a user-friendly checkout experience. Sometimes, the store owners may want to know the address type where the order is to be delivered. Knowing the address type reduces the chances of misdeliveries. And it also helps customers who have specific delivery preferences, such as receiving their orders either at their home or workplace.
This post helps you to add an address type field on the WooCommerce checkout page.
Where to Add Custom Code in WooCommerce?
It is advisable to add the code snippets to the functions.php file of your child theme. Access the file directly from Appearance->Theme File Editor->Locating the child theme’s functions.php from the right sidebar. You can also access it from your theme’s directory file. Insert the following code snippet in functions.php. The alternative & easy option is to install & activate the Code Snippets plugin. You can then add the code as a new snippet via the plugin.
Solution: Add an Address Type Field to the WooCommerce Checkout Page
Let’s imagine an online food delivery service . The code snippet provided here helps such stores to incorporate a custom field as an “Address Type” field into the store, allowing customers to choose between “Home” and “Workplace” delivery options.
// Add custom fields to the billing section of the checkout form
add_filter('woocommerce_checkout_fields', 'ts_add_custom_checkout_field');
function ts_add_custom_checkout_field($fields) {
    // Add the custom radio buttons
    $fields['billing']['billing_address_type'] = array(
        'label'    => __( 'Address Type' ),
        'type'     => 'radio',
        'class'    => array( 'form-row-wide', 'address-type' ),
        'required' => true,
        'priority' => 85,
        'options'  => array(
            'home' => __( 'Home (9AM-9PM)', 'woocommerce' ),
            'work' => __( 'Work (9AM-6PM)', 'woocommerce' ),
        ),
    );

    // Additional CSS within the PHP code to style the radio buttons and add space
    echo '<style>
       /* Add space between radio button labels */
.address-type label {
    display: inline-block !important;
    margin-right: 20px; /* Adjust the spacing as needed */
}

/* Add space between "Home" and "Work" labels */
.address-type label[for="billing_address_type_home"],
.address-type label[for="billing_address_type_work"] {
    margin-right: 20px; /* Adjust the spacing as needed */
}
</style>';

    return $fields;
}

// Save the custom field values to the order
function ts_save_address_type_to_order( $order_id ) {
    if ( isset( $_POST['billing_address_type'] ) ) {
        $selected_option = $_POST['billing_address_type'];

        // Define label mappings based on option values
        $label_mappings = array(
            'home' => 'Home (9AM-9PM)',
            'work' => 'Work (9AM-6PM)',
        );

        // Check if the selected option exists in the label mappings
        if ( isset( $label_mappings[ $selected_option ] ) ) {
            $label = $label_mappings[ $selected_option ];
        }

        // Save both the button value and the label value
        update_post_meta( $order_id, 'Address Type', sanitize_text_field( $selected_option ) );
        update_post_meta( $order_id, 'Address Type Label', sanitize_text_field( $label ) );
    }
}
add_action( 'woocommerce_checkout_update_order_meta', 'ts_save_address_type_to_order' );

// Display the custom field values in the order details page
add_action( 'woocommerce_admin_order_data_after_billing_address', 'ts_display_address_type_in_order_details' );

function ts_display_address_type_in_order_details( $order ){
    // Get and display the button value and the label value

    $address_type_label = get_post_meta( $order->get_id(), 'Address Type Label', true );

    echo '<p><strong>Address Type:</strong> ' . esc_html( $address_type_label ) . '</p>';
}
Output
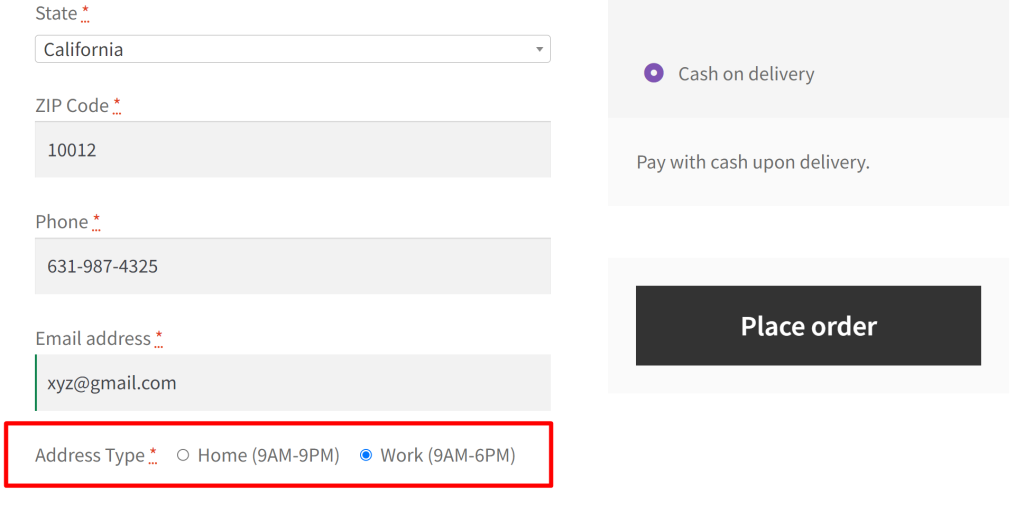
The below image shows us that the ‘Address Type’ field with Home or Work radio buttons is added on the WooCommerce checkout page. Using either of the radio buttons, customers will be able to choose their preferred delivery point.

Admin Section
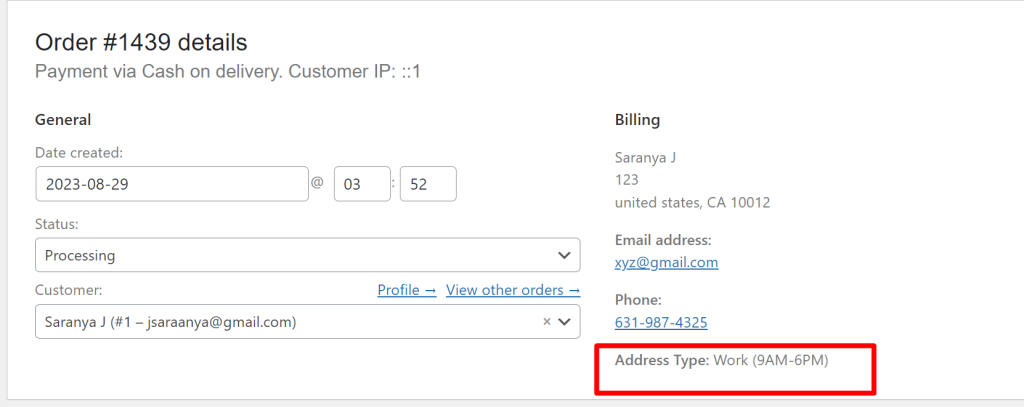
The store owner gets the details of the customer-chosen option such as “Address type: Work (9AM-6PM)” on the Order details as shown below. Thus ensuring that he delivers the order to the customer’s office location during their specified delivery time.

Code Explanation
1. Hook into WooCommerce Checkout Fields
- The code begins by using the add_filter function to attach the ts_add_custom_checkout_field function to the woocommerce_checkout_fields hook. When the checkout fields are being generated, this function is called to add a custom radio button field to the billing section of the checkout form.
2. Add Custom Radio Buttons for “Address Type”
Inside ts_add_custom_checkout_field, we define the custom radio button field for “Address Type.” This field is added to the billing section. It includes:
- A label, which is displayed as “Address Type.”
- A type, set to ‘radio’ for radio buttons.
- A class, assigning custom CSS classes for styling.
- A requirement flag is set to true, indicating that this field is required during checkout.
- A priority value of 85, determines its position among other fields.
- Options for the radio buttons, including “home” and “work,” each with its label and description.
3. Apply Custom CSS Styles
Additional CSS styles are injected directly into the page using <style> tags. This CSS handles the appearance of the custom radio buttons. Specifically, it:
- Uses display: inline-block to ensure the radio buttons and labels appear horizontally.
- Sets a margin-right of 20px to create space between the radio buttons and their labels.
- Further adjusts the spacing for “Home” and “Work” labels by targeting their specific for attributes.
4. Return the Modified Fields
- The modified $fields array is returned. It now includes the custom “Address Type” radio button field, which will be displayed on the checkout page.
5. Save the Custom Field to the Order
- Next, the code defines the ts_save_address_type_to_order function which is hooked to woocommerce_checkout_update_order_meta. This function runs when the WooCommerce checkout is updated.
- It checks if the billing_address_type field is set in the $_POST array. If so, it saves the selected address type (either “home” or “work”) as post meta data for the order.
- Additionally, label mappings are defined to associate selected options with their labels, ensuring data consistency.
- The selected option and its label are both sanitized and stored as post meta data for the order.
6. Display the Custom Field in Admin Order Details Page
Lastly, the ts_display_address_type_in_order_details function is defined. This function is hooked to woocommerce_admin_order_data_after_billing_address. It displays the selected “Address Type” in the order details page in the WooCommerce admin area. The function retrieves the “Address Type Label” from post meta data and displays it within a <p> element with a label “Address Type.”
Conclusion
The code provided above helps you to add an address type field on the checkout page. You can further extend this functionality to add delivery date and time slot based on the customer’s address type selection. You can set different delivery time slots for “Home” and “Work” addresses.
Let us know your feedback on how the code was useful or any other queries in the comments section.


