


Many store owners run multiple WooCommerce sites, for instance, one for customer registration and another for shopping. Manually keeping customer data consistent between these sites can be tedious and error-prone.
Thankfully, WooCommerce REST API allows developers to automatically sync customer data across sites in real-time.
Solution: How to Automatically Sync WooCommerce Customers Data Between Two Sites via REST API
This code snippet automatically transfers customer data from the source site (where customers register) to the target site (where you want customer records to appear), keeping both sites synchronized without any manual intervention.
Note: The code runs on the source site because it listens to the woocommerce_created_customer hook. Every time a new customer is registered, it sends their data is sent to the target site via REST API.
// Hook triggered when a new customer is created
add_action('woocommerce_created_customer', 'ts_auto_create_customer_on_target_site', 10, 1);

function ts_auto_create_customer_on_target_site($customer_id) {

    // -----------------------------
    // 1. Source customer info
    // -----------------------------
    $customer = new WC_Customer($customer_id);

    $email = $customer->get_email();

    // Use fallback if first/last name are empty
    $first_name = $customer->get_billing_first_name() ?: 'Customer';
    $last_name  = $customer->get_billing_last_name() ?: strstr($email, '@', true); // part before @
    $username   = $customer->get_username() ?: sanitize_user($email, true);

    // -----------------------------
    // 2. Target site REST API info
    // -----------------------------
    $target_site_url = 'https://boundless-okapi-add520.instawp.xyz/wp-json/wc/v3/customers';
    $consumer_key    = 'ck_8e84927ee59a83e869e17a045ad62fafbec14f6b';
    $consumer_secret = 'cs_fc14ad1dbcf4e38ac9a889eb700f5a1ea1a95ce8';

    // -----------------------------
    // 3. Build the customer data
    // -----------------------------
    $customer_data = array(
        'email'      => $email,
        'first_name' => $first_name,
        'last_name'  => $last_name,
        'username'   => $username,
        'password'   => wp_generate_password( 12, false ),
        'billing'    => array(
            'first_name' => $first_name,
            'last_name'  => $last_name,
            'email'      => $email
        )
    );

    // -----------------------------
    // 4. Prepare API request with Basic Auth
    // -----------------------------
    $auth = base64_encode( $consumer_key . ':' . $consumer_secret );

    $args = array(
        'headers' => array(
            'Content-Type'  => 'application/json',
            'Authorization' => 'Basic ' . $auth
        ),
        'body'    => json_encode($customer_data),
        'timeout' => 30,
        'method'  => 'POST'
    );

    // -----------------------------
    // 5. Send the request
    // -----------------------------
    $response = wp_remote_post($target_site_url, $args);

    // -----------------------------
    // 6. Handle response / errors
    // -----------------------------
    if (is_wp_error($response)) {
        error_log('REST API customer creation failed: ' . $response->get_error_message());
    } else {
        $status_code = wp_remote_retrieve_response_code($response);
        $body        = wp_remote_retrieve_body($response);
        error_log("REST API customer response: Code $status_code, Body: $body");
    }
}
Output
After you add the code on the source site, let’s see how the REST API setup works on the target site, and how customers are synced automatically in real-time.
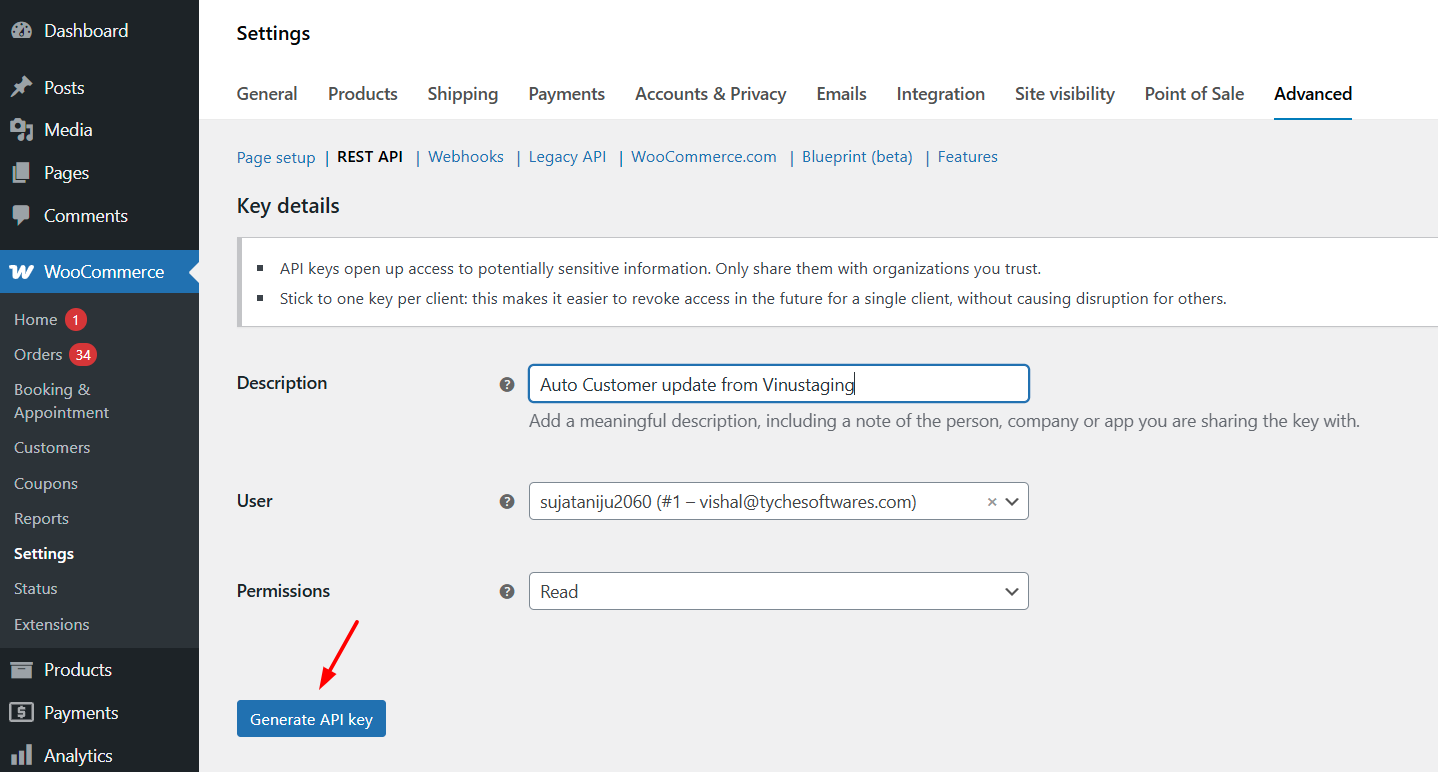
Step 1: Create REST API Keys on the Target Site
- Go to WooCommerce → Settings → Advanced → REST API
- Click Add Key
- Give it a clear name like: Customer Sync Key
- Set Permissions → Read/Write
(Write permission is needed because the source site will create customers via API.) - Save, then copy the:
- Consumer Key
- Consumer Secret

These keys authenticate the API request is coming from the source site.

If the keys are incorrect or permissions are “Read Only,” the target site will reject the request.
Step 2: Register the customer on the Source Site
Once the code is added to the source site’s functions.php (or a custom plugin), WooCommerce will automatically trigger the hook:
woocommerce_created_customer
This hook fires immediately after a new customer account is created.

Once the customer is registered:
- The code collects the new user’s email, first name, last name, and username.
- If some data is missing, fallback values are automatically generated.
- The data is converted into a JSON payload.
- A POST request is made to the target site’s REST API endpoint:
/wp-json/wc/v3/customers
This payload is authenticated using Basic Auth via the Consumer Key + Secret you generated earlier. So, once a new customer signs up on your main site, their details are automatically pushed to the second site
Step 3: Verify on the Target Site
To confirm everything is working, log in to the target site and go to WooCommerce → Customers — you will see the new customers registered on the source site appear automatically.

If you’re working with multiple WooCommerce or WordPress environments, customer syncing is just one part of a bigger automation workflow. You can extend similar REST API concepts to content management as well—for example, creating posts on another WordPress site using the REST API. This helps keep both your customer data and your content in sync across your ecosystem.
