Table of Contents
In the vast landscape of e-commerce, where an incredible array of products is just a few clicks away, ensuring a seamless shopping experience has never been more crucial. A fundamental component of this experience is the often underestimated concept of WooCommerce shipping classes.
Far from being a mundane technicality, shipping classes have the potential to revolutionize how businesses handle several aspects. These include shipping, customer satisfaction, and customers’ purchasing decisions. By exploring the concept of setting up these classes, you open doors to a world of customization, efficiency, and customer-centricity. These can surely set your e-commerce enterprise apart.
So, whether you’re a small boutique operation or a sprawling online marketplace, read on to unravel the intricacies of optimizing your shipping strategy through meticulous class setup.
What are Shipping Classes?
Shipping classes are a categorization and organizational feature within the WooCommerce platform. They allow online store owners to group products with similar shipping characteristics together, enabling more precise control over shipping rates and options.
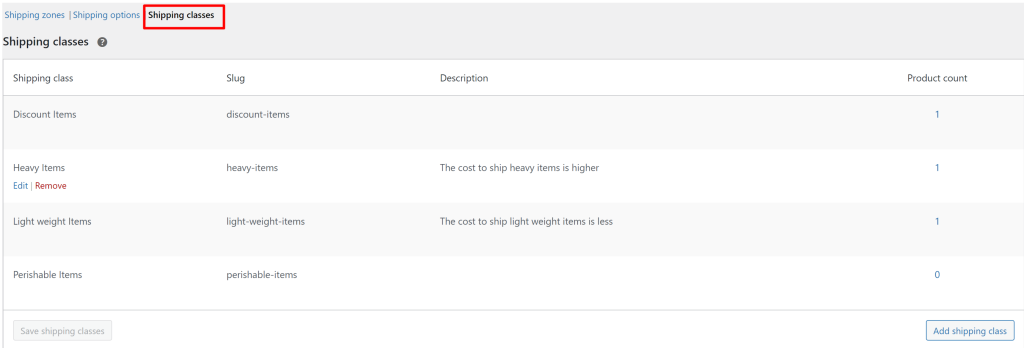
In essence, shipping classes serve as a way to classify products based on various attributes such as size, weight, fragility, or any other factors that might influence the shipping cost or method. However, it’s important to note that shipping classes themselves don’t directly determine shipping rates for customers; instead, they provide the foundation upon which shipping rates can be defined.
Here’s a simplified breakdown of how WooCommerce shipping classes work:
- Categorization: Products are grouped into distinct classes based on shared shipping attributes. For example, a store selling a variety of items might create shipping classes like “Small Items,” “Medium Items,” and “Bulky Items.”
- Shipping Rates: Once products are organized into shipping classes, store owners can then associate specific shipping rates with each class. This allows for tailored shipping costs that reflect the unique shipping requirements of different product groups.
- Customer Experience: When a customer makes a purchase, the shipping options presented to them will be influenced by the shipping class of the product(s) in their cart. This means customers can choose shipping methods that best suit their needs and budgets, resulting in a more satisfying shopping experience.
- Operational Efficiency: From the business perspective, shipping classes help streamline shipping logistics. By categorizing products with similar shipping needs, store owners can accurately estimate shipping costs, reduce errors, and optimize the fulfillment process.
- Diverse Scenarios: Shipping classes are particularly beneficial when an online store offers a range of products with varying shipping requirements. For instance, if a store sells both lightweight accessories and heavy furniture, creating distinct shipping classes allows for appropriate shipping rates for each category.
Difference Between Shipping Methods and Shipping Classes
Shipping Methods and Shipping Classes are two distinct concepts in e-commerce, each serving a specific role in managing the shipping process. However, in the world of e-commerce jargon and technicalities, it’s easy to sometimes confuse the two – or find it a little difficult to differentiate clearly. So, here’s an overview of the key differences between them.
| Aspect | Shipping Methods | Shipping Classes |
|---|---|---|
| Definition | Different options or services for shipping goods | Groups of products categorized based on similar shipping characteristics or properties |
| Examples | Standard, expedited, express, free shipping, etc. | Fragile, perishable, bulky, small, lightweight, etc. |
| Selection by Customer | Customers can choose the method they prefer | Often pre-defined by the store based on product properties |
| Cost Variation | Each method typically has different costs | Each class may have specific shipping rates or cost adjustments |
| Delivery Speed | Varies in terms of speed and delivery time | Doesn’t necessarily define delivery speed, focuses on product types |
| Packaging Requirements | May require specific packaging for certain methods | May influence packaging guidelines based on the class |
| Customization | Allows for tailored shipping preferences | Helps in applying standard shipping rules to different product types |
| Impact on Business | Can attract customers based on shipping preferences | Helps in managing shipping logistics efficiently based on product types |
| Flexibility | Offers more flexibility to customers’ needs | Offers more structured and systematic handling of varied products |
| Promotions and Offers | Shipping methods can be used for promotional deals | Shipping classes can be used for targeted promotions or offers to specific product types |
| Checkout Process | Selected during the checkout process | Applied automatically based on the product attributes |
Shipping Methods
Shipping methods refer to the various options available to customers for delivering their purchased products. They encompass the different ways in which products are physically transported from the seller to the buyer. Shipping methods are customer-facing and directly impact how customers perceive shipping options and costs during the checkout process.
In WooCommerce, different shipping methods for different products can also be specified. Common shipping methods include standard shipping, expedited shipping, overnight delivery, local pickup, and international shipping.
Shipping methods are configured by the store owner or administrator. This involves defining the available methods, setting shipping rates for each method, and specifying conditions that might affect the availability of certain methods (such as destination or product type).
Shipping methods are often influenced by factors like distance, shipping speed, and package weight. Customers can select the method that best fits their preferences and budget.
Shipping Classes
Shipping classes are a way to categorize products based on their shared shipping attributes or characteristics. They are used internally by the store owner to group products with similar shipping needs. Shipping classes are primarily used for operational and logistical purposes behind the scenes. They help store owners manage shipping rates and options in a more organized manner.
Shipping classes might be based on product attributes like size, weight, fragility, or delivery time. For instance, a store might create classes for “Glass Items,” “Wood Items,” or “Metal Items.”
Shipping classes are configured by the store owner/administrator. They are used to define the shipping attributes of products, which can then be used to set up shipping rates and conditions for different classes.
Shipping classes indirectly influence shipping rates by providing a basis for determining how much to charge for shipping products within a specific class. They help tailor shipping costs to the unique characteristics of products.
While it is surely beneficial to harness the in-built power of shipping methods and classes in WooCommerce, the true potential of the platform lies in plugins. It may be a good idea to invest in plugins to streamline and optimize your entire shipping strategy, such as Order Delivery Date Pro.
Why are WooCommerce Shipping Classes Important?
WooCommerce shipping classes play a crucial role in the success of an e-commerce store’s shipping strategy. Are you wondering why? Here’s why they are important:
- Tailored Shipping Rates: They enable you to offer accurate and fair shipping costs to customers, regardless of whether they’re purchasing small, lightweight items or larger, bulkier products. Tailoring shipping rates in this way helps prevent customers from being deterred by high shipping costs and reduces the likelihood of abandoned carts.
- Customer-Centric Experience: Upon categorizing products into shipping classes, you empower customers with choices that match their preferences and needs. Offering various shipping options based on the nature of the products enhances the overall shopping experience and increases customer satisfaction.
- Flexibility in Product Offerings: E-commerce stores often sell a diverse range of products with different shipping requirements. Shipping classes provide the flexibility to accommodate these varied needs. Creating shipping classes ensures that each product’s shipping needs are met appropriately.
- Operational Efficiency: Organizing products into shipping classes enhances operational efficiency. It simplifies the process of assigning shipping rates and methods, reducing the risk of errors. This efficiency extends to the fulfillment stage, as products with similar shipping attributes can be grouped together for smoother packing and shipping.
- Cost Optimization: For store owners, implementing shipping classes can lead to cost optimization. By accurately reflecting the shipping costs associated with different product types, you can avoid undercharging or overcharging for shipping. This contributes to better financial management and prevents unexpected shipping-related losses.
- Enhanced Product Management: Shipping classes provide an additional layer of structuring to your product management system. They make it easier to categorize and manage your products, especially if you have a wide variety of items. This can simplify inventory management and aid in making informed business decisions.
- Competitive Advantage: Offering a variety of shipping options and accurately calculated shipping rates gives your store a competitive edge. Customers are more likely to choose a store that provides transparent and reasonable shipping costs, contributing to higher conversion rates and customer loyalty.
- Scalability: As your e-commerce business grows, maintaining efficient shipping practices becomes increasingly important. Shipping classes lay the foundation for a scalable shipping strategy by providing a structured approach to managing diverse product types and their associated shipping costs.
In essence, WooCommerce shipping classes are instrumental in harmonizing the balance between customer satisfaction and operational efficiency. Through clever use of this feature, you can create a positive shopping experience that aligns with customer preferences and enhances your store’s overall performance.
Now that you’re aware of the importance of shipping classes, let’s learn how to use this feature.
Adding Shipping Classes
The process of working with shipping classes involves several steps to ensure accurate and customized shipping options for your products. Here’s a step-by-step guide on how to add shipping classes.
Access WooCommerce Settings
- Log in to your WordPress admin dashboard.
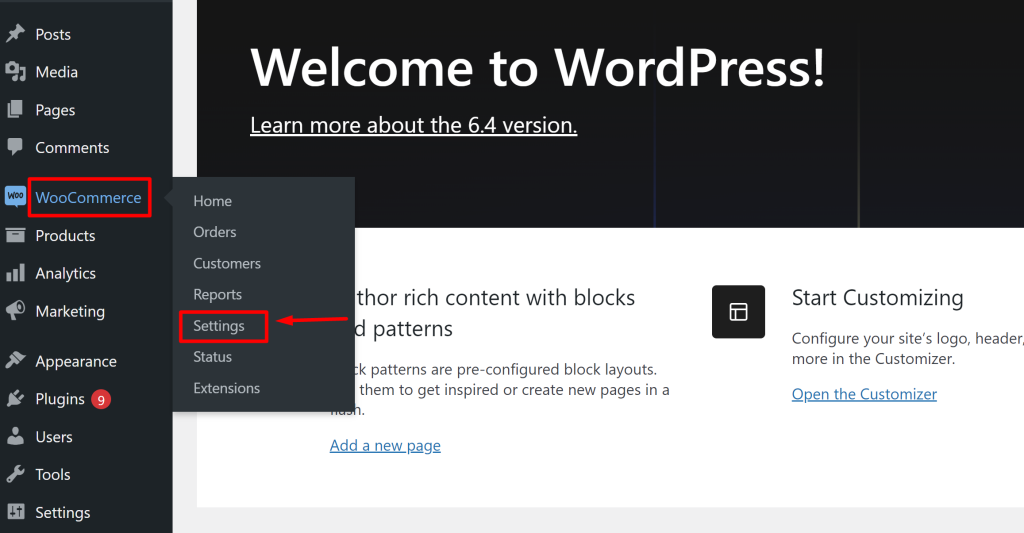
- From the left-hand menu, hover over “WooCommerce,” and then click on “Settings.”
Navigate to Shipping Classes
- Within the “WooCommerce Settings” page, click on the “Shipping” tab at the top.
- Scroll down to find the “Shipping Classes” section. Click on it to access the shipping class settings.
Add a New Shipping Class
- In the “Shipping Classes” section, you will see a list of existing shipping classes if you have any.
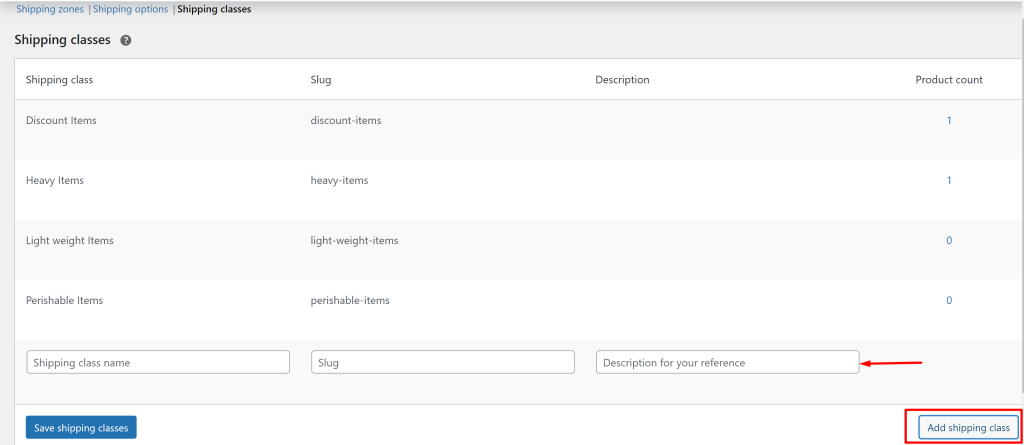
- To add a new shipping class, locate and click on the “Add Shipping Class” button. This action will create a new row in the table for you to enter details.
Fill in Shipping Class Details
In the new row, you will find several fields to fill in:
- Name: Enter a descriptive name for the shipping class (for instance, you can create classes for WooCommerce shipping by weight and size of products).
- Slug: You can leave this field blank, and WooCommerce will generate a unique identifier automatically. Alternatively, you can manually enter a slug if you prefer.
- Description: Provide a brief description of the shipping class for reference.
Once you’ve filled in the necessary information, click the “Save Shipping Classes” button located at the bottom of the page. Your new shipping class will now be available for you to use when assigning shipping rates to products. (In WooCommerce, multiple shipping classes can be created, so you can repeat this process as many times as required).
Editing and Deleting Shipping Classes
You might want to tweak or remove a shipping class or two. Here’s how to do that.
Editing Shipping Classes: To edit a shipping class, find it in the list, hover over its name to reveal options, and select “Edit.” Modify the name, slug, and description in the form that appears. Finally, click “Save Shipping Classes” at the bottom to apply your changes.

Deleting Shipping Classes: Next to the “Edit” option, you will see a “Remove” option under the corresponding shipping classes. Click the “Remove” option to delete the shipping class from your online store.

It is vital to note that deleting a shipping class will remove it from your WooCommerce setup and also disconnect it from any products that were assigned to it. Ensure you no longer need the shipping class before deleting it.
You’ve successfully added a new shipping class in WooCommerce. This class can now be linked to specific products, providing customized shipping options and rates based on their unique characteristics. Next, let’s proceed to assign these shipping classes to products.
Assigning Shipping Classes to Products
1) Access WooCommerce Product List:
- Log in to your WordPress admin dashboard.
- From the left-hand menu, navigate to “WooCommerce,” then click on “Products.”
2) Select and Edit a Product:
- Locate the desired product within the product list.
- Hover over the product title and click “Edit” to access the product’s editing screen.
3) Assign a Shipping Class:
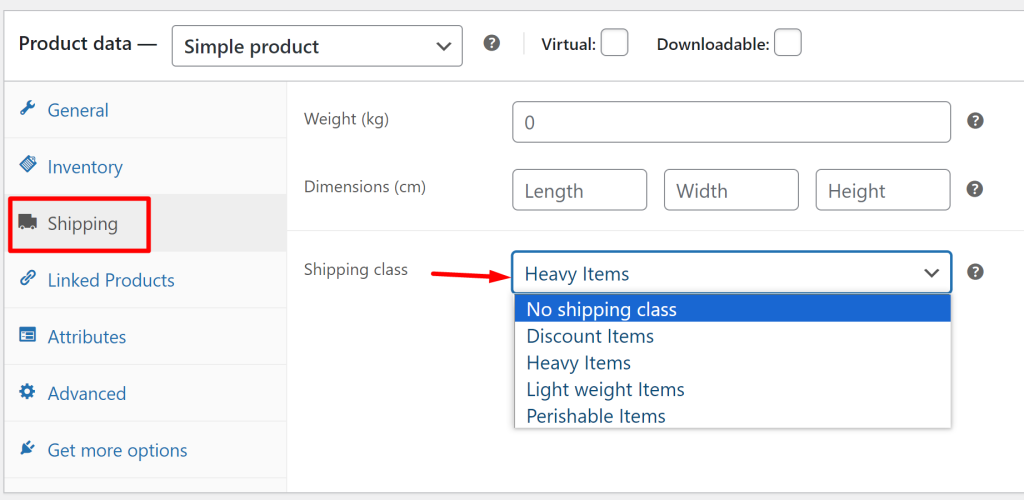
- Inside the product editor, find the “Shipping” section.
- Look for the “Shipping Class” dropdown menu.
- Click the dropdown menu to view available shipping classes.
- Choose the relevant shipping class for the product.
4) Save Changes:
- Once you’ve selected the shipping class, save your changes using the “Save” or “Update” button typically located at the top or bottom of the product.
Assigning Shipping Classes for Variable Products (if Applicable)
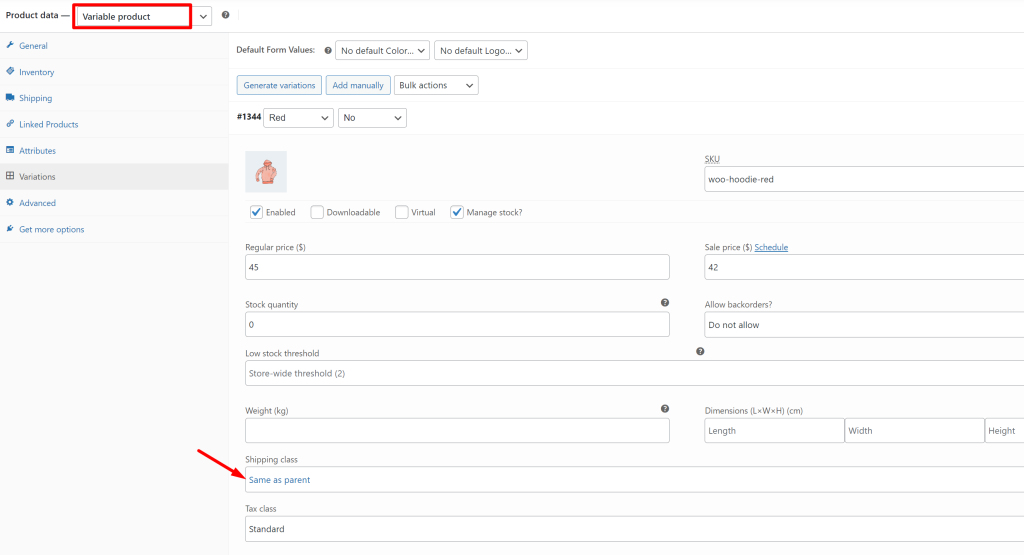
If you’re working with a variable product (a product with variations like different sizes or colors), you’ll need to assign a shipping class to each variation separately. To do this:
- Expand the variations section within the product editor and find the variation you want to edit.
- Similar to the main product, locate the “Shipping Class” dropdown for each variation and select the appropriate shipping class.
- Remember to save your changes after making adjustments to the variations.
| Recommended Reading: How to Choose the Best Shipping Strategies: Free, Flat Rate, and More |
Repeat for Other Products
If you have multiple products that need shipping classes assigned, repeat the process for each product. Navigate back to the product list, locate the next product, and follow the same steps as above to assign shipping classes.
Bulk Editing Shipping Classes
The bulk editing shipping classes feature is particularly useful when you want to update shipping classes for a group of products that share similar characteristics or requirements. By following these steps, you’ll be able to efficiently and quickly assign a new shipping class to multiple products simultaneously.
Access WooCommerce Product List
- Log in to your WordPress admin dashboard and find your way to the shipping settings WooCommerce offers.
- From the left-hand menu, hover over “WooCommerce,” and then click on “Products.”
Select Products for Bulk Editing
- In the list of products, locate the products for which you want to bulk-edit the shipping classes.
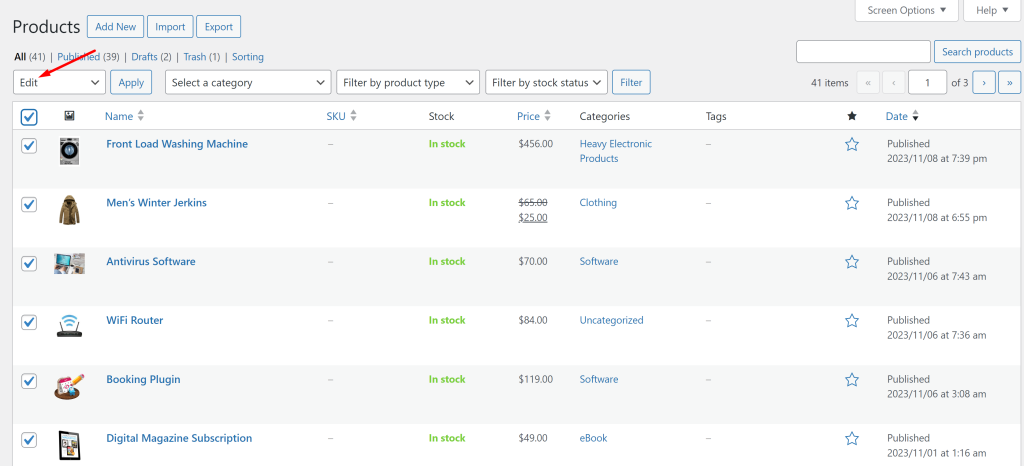
- On the left-hand side of each product’s entry, you will find checkboxes. Tick the checkboxes of the products you wish to edit. You can select multiple products simultaneously.
Initiate Bulk Editing
- With the products selected, find the “Bulk Actions” dropdown located above the product list.
- Click on the dropdown to reveal a list of bulk actions you can perform.
- From the list, select “Edit” and then click the “Apply” button next to the dropdown. This action initiates the bulk editing process.
Modify Shipping Classes
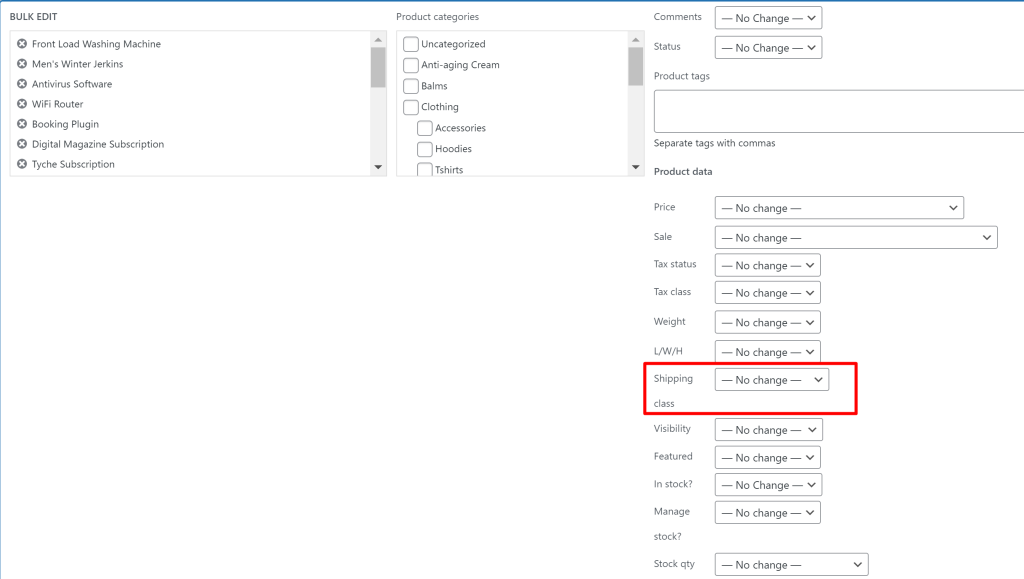
- After applying the bulk edit, you will be redirected to a new screen where you can edit the selected products.
- Look for the “Shipping Class” field or dropdown on this screen.
- Click on the “Shipping Class” dropdown to see the available shipping classes.
- Select the shipping class you want to apply to the selected products from the dropdown.
Save Bulk Editing Changes
- After selecting the desired shipping class for the bulk-edited products, ensure you save your changes.
- Look for an “Update” or “Save” button on the bulk edit screen. Click this button to save the new shipping class assignments for the selected products.
Confirm Changes
- Once the changes are saved, you’ll receive a confirmation message indicating that the bulk edit was successful.
To Sum Up
In the dynamic realm of e-commerce, optimizing the shipping process through well-structured WooCommerce shipping classes for diverse product types is a game-changing strategy. Upon categorizing products based on attributes like size and weight, businesses can offer tailored shipping options that cater to individual customer preferences.
This personalized approach enhances customer satisfaction by providing transparent and relevant shipping costs. It also streamlines operations, ensuring accurate estimates and efficient order fulfillment.
In this journey towards seamless shipping, plugins like Tyche Softwares’ Order Delivery Date Pro and Product Delivery Date Pro emerge as invaluable allies. These tools amplify the effectiveness of shipping classes, particularly focusing on shipping and order fulfillment.
They are packed with features that allow businesses to align their logistics with customer schedules, boosting satisfaction. The plugins also provide enhanced control over delivery time slots, enabling businesses to manage resources effectively and further elevate the post-purchase experience.
In the competitive landscape of e-commerce, such plugins act as catalysts, not only simplifying intricate shipping processes but also driving customer loyalty and long-term success.


