Table of Contents
WooCommerce is a great tool for building any kind of digital store. Whether you sell digital or physical products, WooCommerce has the ability to handle them. If you are selling physical products it is important to understand the various shipping options available. With appointment software for clinics in United States, you can oversee open appointment slots and cancellations and efficiently use every hour of a working day.
To make your life easier we have put together this stellar guide.
Accessing WooCommerce Shipping Dashboard
In your WordPress dashboard navigate to WooCommerce > Settings and click on the Shipping tab.

WooCommerce Shipping Zones
The very first step is to add shipping zones. These can be regions or countries that you deliver to. For example, the United States, a country or North America a Region. It’s a geographical region.
In the Shipping Zones page click on Add shipping zone.

Then enter the name of your zone and the zone’s regions. For example, we have entered Kenya as the name and selected the country Kenya as the region. You can select multiple countries.
Then click on save changes to finish creating your shipping zones.
If we were delivering to East Africa for example, we could name the zone as East Africa. We could then add countries such as Tanzania, Rwanda, Uganda, and Kenya that all fall in East Africa.
Read Related post: How to Setup WooCommerce for Dropshipping
There is also an option to limit the zone to specific zip codes. This option can be useful for businesses such as restaurants, that only deliver within a limited area.

Sometimes, it is useful also to display an estimated delivery date or time. WooCommerce does not have built-in functionality for this and you will have to use a plugin in such a case. Order Delivery Date Pro for WooCommerce is an excellent solution for this. It helps reduce cart abandonment by displaying an estimated or confirmed delivery date. It also allows you to schedule local pickups. Again this can be useful for businesses such as restaurants that need to deliver on time, or if the customer is coming to pick up the items, they can get a scheduled time.
The plugin allows you to create delivery schedules by Product Categories, Shipping Methods, Shipping Classes, Table Rate Shipping Methods & Pickup Locations. You can read more about the plugin’s features and benefits here.
WooCommerce Shipping Methods
The next step after configuring the shipping zones is to set up the shipping methods.
Click on Add shipping method.

You will then need to select the shipping method. There are 3 options available. Which are flat rate, free shipping and local pickup.
We will have a detailed look at each of these. Select flat rate and click on Add Shipping method.

With flat-rate shipping, you can charge a standard rate per item or order or shipping class. Free shipping allows your customers to enjoy zero shipping fees. Local pickup means your customers will come to your location and pick the item up. Once you have added the shipping method you will see it as shown below. We have added all three shipping methods. Now we need to configure each of these shipping methods.
1. Setting up flat rate shipping
Hover over the flat rate shipping and click on edit as shown below.

You can change the name of the shipping method. For example, instead of Flat rate, you could call it standard shipping fees. You can also select if the rate is taxable. Finally, you can configure the rate or amount of shipping. We have set it to $100. Click Save Changes.

2. Setting up free shipping
Hover over the free shipping and click on edit as shown below.

From here you can change the title of Free shipping. You can also select from 4 different options for free shipping.
- You can use a coupon to offer free shipping. This way only customers with the coupon code will get free shipping.
- You can select free shipping to be only available for a minimum order amount. For example, you can set free shipping to be available only if the total order value is more than $100 or $50 or whatever amount is relevant for you.
- You can set up free shipping to have a minimum order amount OR a coupon. In this case, if the customer has a coupon or is purchasing above the minimum order value they will get free shipping.
- You can select it to have a minimum order amount AND a coupon. In this case, the customer must have a coupon and must also purchase above the minimum free shipping level you set.

3. Setting up Local Pickup
Hover over the Local Pickup option and click on edit.

Just like the first 2 options, you can also change the title of Local Pickup, for example, you could change it to store pickup. You can also select if the cost for local pickup is taxable and you can set a charge for local pickup as well.
For example, we have set it to $10.

WooCommerce Shipping Options
The second tab under the WooCommerce shipping dashboard is the shipping options tab. There are 3 items you can configure from here.
- You can select if you want shipping calculations to be done on the cart page or if you want to hide the shipping cost until an address is entered. It is recommended to hide the shipping costs until an address is entered. This way customers will get a more accurate shipping cost and will not be surprised by changing shipping costs.
- You can also select the default shipping destination. This can be to the shipping address, to the billing address or you can force your customers to use the same billing address for shipping as well.
- Finally, you can enable the debug mode from here as well.

WooCommerce Shipping Classes
The third tab under the WooCommerce Shipping dashboard is the shipping classes tab.
Shipping classes can be useful in several situations. Especially if you have to ship items of different sizes and weight. Some could be large, others could be small, therefore the shipping cost could be different. You can easily create shipping classes and assign products to different shipping classes to have different shipping charges on them.
In the shipping classes tab, click on Add shipping class.

Enter the name of the shipping class, enter the slug, description, and click on Save shipping class.

You can add as many shipping classes as you wish. An example is shown below.

1. Changing the Shipping class of products
When editing your product, under the product data, under the shipping tab on the edit product page you will find the shipping class option. From here you can select one of the shipping classes from the shipping classes that were created above. An example is shown below.

2. Setting up WooCommerce Shipping Classes with Shipping Methods
There are 3 shipping methods that we have configured in the steps above. After creating shipping classes, you should now have more configurations options under each shipping method.

For example, if you click on the shipping zones tab, and under shipping methods click on edit under flat rate, you will see some extra options.
In the example below, we have set up different flat rate shipping costs for each class.

Here is a front-end preview of how the shipping methods we have set up look. You will find these on the checkout page of your store.

Bonus: Creating coupons for free shipping
In the above steps, you must have seen that you can require your customers to have a coupon for free shipping. This can make sure that only customers with the coupon code can avail the free shipping option.

Now let us see how you can create a coupon for free shipping.
In your WordPress dashboard under the WooCommerce menu click on coupons.

Then click on Add Coupon.

There are 5 things that you will need to configure here.

- The coupon code – this is the code your customers will enter in order to avail free shipping.
- Description – this is an internal description of the coupon code to help you remember what the coupon code is for.
- Discount type – this will need to be fixed product discount.
- You will need to check this box to offer free shipping.
- Finally, in this section, you can set an expiry date for the coupon.
Once you are done click on publish. An example of our configuration is shown below.

If customers uses the code H47KD9RT during checkout they will be able to avail free shipping. If the H47KD9RT sounds like a tough coupon to remember, refer to our guide on How to Create Unique Coupon Codes in WooCommerce programmatically.
WooCommerce Free Shipping Tips
Customers love free shipping. It has shown to boost conversions for online stores. If you are able to offer it to your customers, here are some bonus tips for free shipping.
1. Hide other shipping methods when free shipping is available
In some cases, it might be useful to hide the other shipping methods if free shipping is available. This will help make the checkout process smoother for the customer. In most cases, a customer will not select another shipping method such as flat-rate when free shipping is available unless there is a difference in delivery timings for free shipping and paid shipping.
You can refer to our guide on How to hide other WooCommerce shipping methods when Free Shipping is available.
2. Display the remaining cost for a customer to avail free shipping on your WooCommerce store
Sometimes a customer may have added several items to cart but may not have reached the threshold required for free shipping. If they are close to the free shipping limit you can display a notification showing them how much they would need to purchase more in order to receive free shipping. Here is an example.
If a customer buys items worth $90 and the shipping cost is $8 their total bill is $98. Suppose you are offering free shipping for orders above $100, you can let the customer know that they can purchase an item worth $10 or more to avail free shipping.
Here is a guide on How to Display the remaining cost for a customer to avail free shipping on your WooCommerce store.
This can help increase the average order value.
Advanced WooCommerce Shipping Settings
1. Table rate shipping
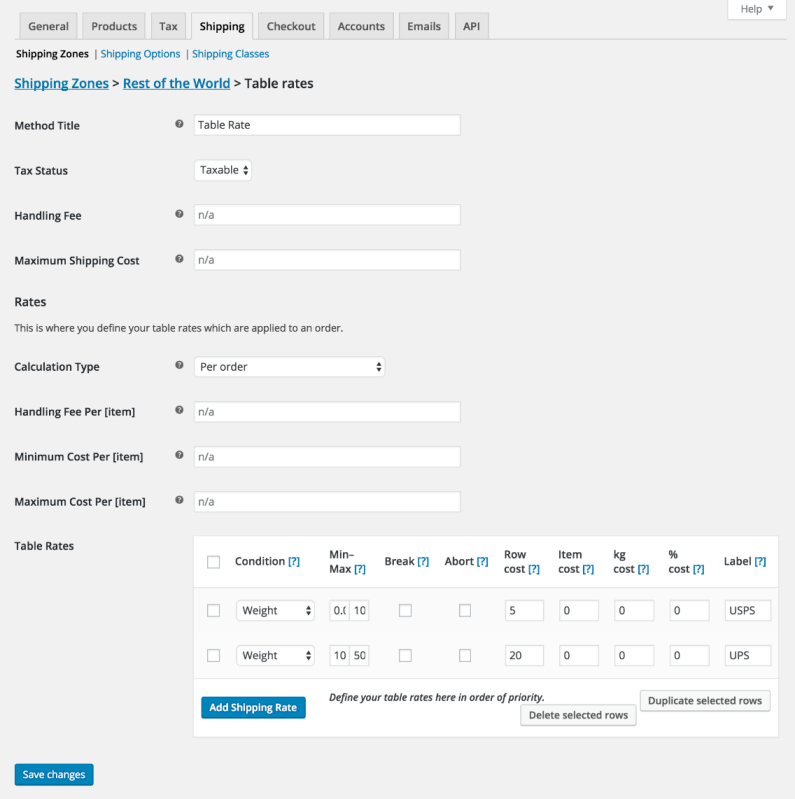
Sometimes you may need advanced shipping configurations. For example, based on the weight of a product or based on the size of a product. Often WooCommerce stores will have products of various sizes and weights. Therefore, the built-in options of WooCommerce shipping may not be enough.
In such a case a more advanced solution such as table rate shipping is required. Using the table rate shipping plugins, you can set up more complex rule-based shipping cost calculations. For example,
- Based on weight
- Based on cart or product totals
- Based on items in the cart
- Based on shipping classes, etc.
Here is a real-life example:
- If an item from the order weight 2-4kg then add $10 to the shipping cost.
- If item shipping class lightweight appears in the cart, then subtract $2 from the total.
- If there are more than 3 items in the order, then add $5 to the total shipping cost.
These conditions can be tabulated as follows:
| Rule based on | Conditions | Shipping class? | Cost to add |
| weight | 2-4 kg | no, every product | $10 |
| items | any item | yes, lightweight | -$3 |
| items | 3 or more items | no, every product | $5 |
This can be achieved using the Table Rate Shipping for WooCommerce plugin. It’s an excellent solution that simplifies the process of table rate shipping setup.

Another great plugin is the Table Rate Shipping Plugin

The major difference between the 2 plugins is the price. Table Rate Shipping for WooCommerce costs $25 while Table Rate Shipping costs $99. Both plugins generally have the achieve the same functionality although they do it in different methods.
2. Advanced Flat Rate Shipping Plugin for WooCommerce
The Advanced Flat Rate Shipping Plugin is perfect for store owners who need to configure different shipping rules for different conditions. For example, if you want to apply different shipping costs or methods for various products or shipping regions, it can be achieved using this plugin.
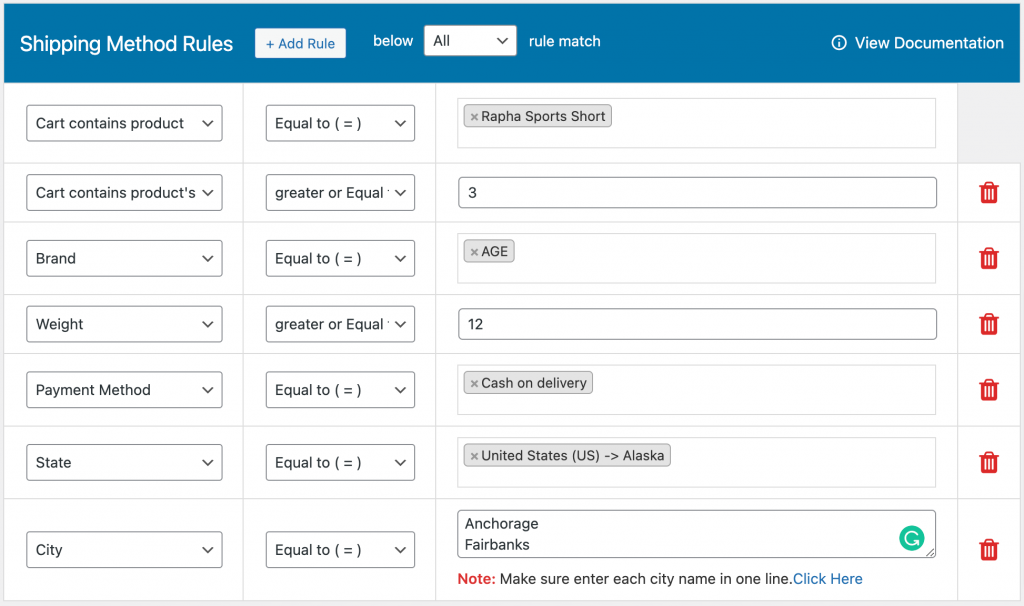
This advanced plugin lets you create two types of sets of conditions per shipping method:
- Shipping Method Rules
You can specify the scope of your shipping method by specifying the accepted values for different attributes related to products, cart, payment methods, shipping location, and user. As per your configuration, when any one or all rules matches the mentioned conditions, the customer will be charged for shipping as per the enabled method.

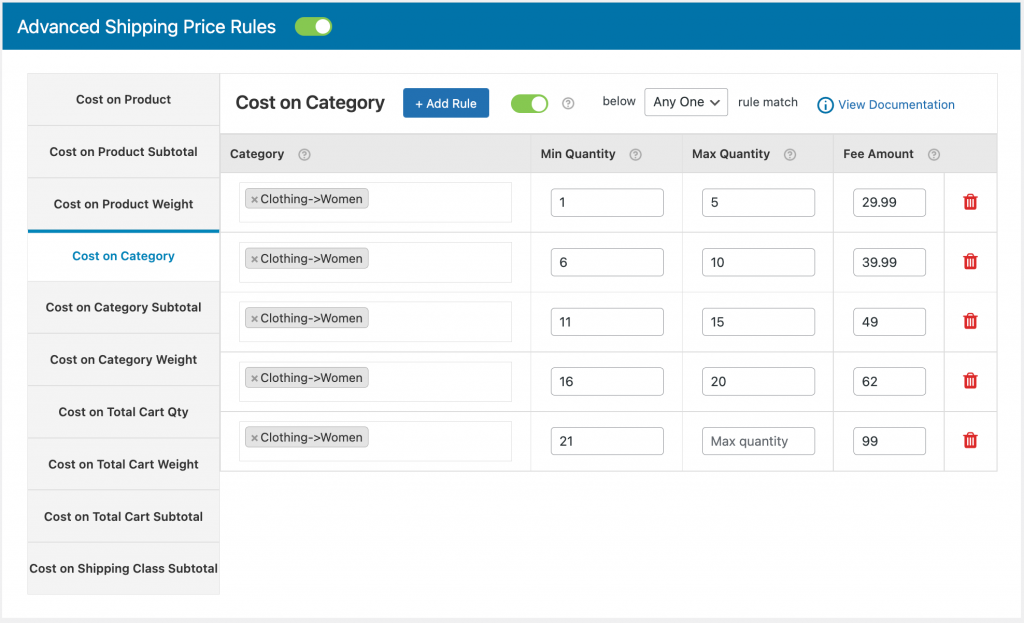
- Advanced Shipping Price Rules
While using the Advanced Flat Rate Shipping Rules, you can also apply advanced rules to every method being created. These rules comprise conditions related to one or multiple ranges, e.g. cart subtotal range, product quantity range, and so on. You can think of it as enabling table-rate shipping for your store.

Plugin Features
- Apply fixed-rate or percentage-based shipping fee on your store;
- Add conditions related to Product, Category, User role, Country, etc.;
- Apply one or multiple advanced or basic conditions to define a shipping method’s scope;
- Create multiple shipping fee related methods with different conditions;
- Enable free shipping for one or multiple conditions;
- Enable table-rate shipping using the plugin;
- Create custom shipping zones to re-use grouped locations in various shipping methods
- Apply shipping free when just one condition matches or when all conditions match;
- 100% Compatible with WPML.
Real-life Examples / Usecases
- If the cart weight is 10kg to 15kg, apply a shipping fee of $20 to the user.
- If cart subtotal is $500+ after discount, apply a 1% shipping fee. Keep it 5% otherwise.
- If the shipping address is from New York and the buyer has purchased 10+ t-shirts, give him a free shipping facility.
3. Custom WooCommerce Shipping Methods
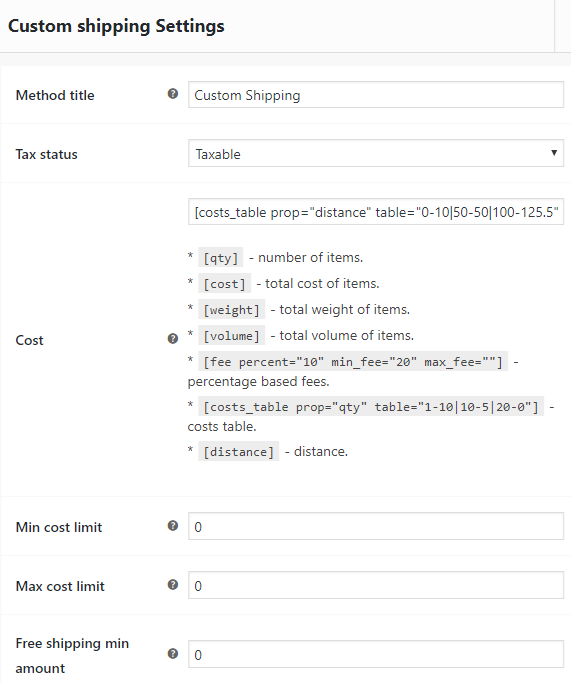
WooCommerce has a limited number of shipping methods by default i.e. Free shipping, Flat rate, and Local Pickup. What if you needed to add a custom shipping method? Take for example if you needed a distance-based shipping method. This is not an in-built feature in WooCommerce, however, no need to despair, there is an excellent solution available. The Custom Shipping Methods for WooCommerce plugin solves this issue beautifully.
The plugin allows you to easily add custom shipping methods for WooCommerce. The shipping calculations can be based on quantity, cost, weight, volume, percentage fee, and distance.

Conclusion
We hope you are now easily able to configure your shipping options in WooCommerce. If you are having trouble with anything, or if you feel we may have left out an important bit, relating to WooCommerce Shipping, do let us know in the comments section below.


