The Date and Time Slot booking type from the Booking & Appointment Plugin for WooCommerce plugin helps you set up WooCommerce appointments on a recurring weekday basis.
With it, your appointment schedules will be based on the same weekdays every week, i.e., every Monday or Friday with specific timeslots.
These work differently for Admin and Customers, so let us look at these two sections separately as below:
Admin Section
Appointments can be for various scenarios ranging from a simple hair spa to an appointment with the doctor.
Let’s take an instance of an appointment with a doctor who is available from Monday to Thursday from 10 AM to 2 PM and in the evening between 4 PM to 7 PM on these weekdays.
Here’s how the product will be created to book appointments.
Create a product from the Products > Add Product link.
Find the Booking Meta Box that allows you to set up your bookable product.
Click the Enable Booking option and click the Booking type drop-down to select the booking type as Date & Time > Fixed Time.
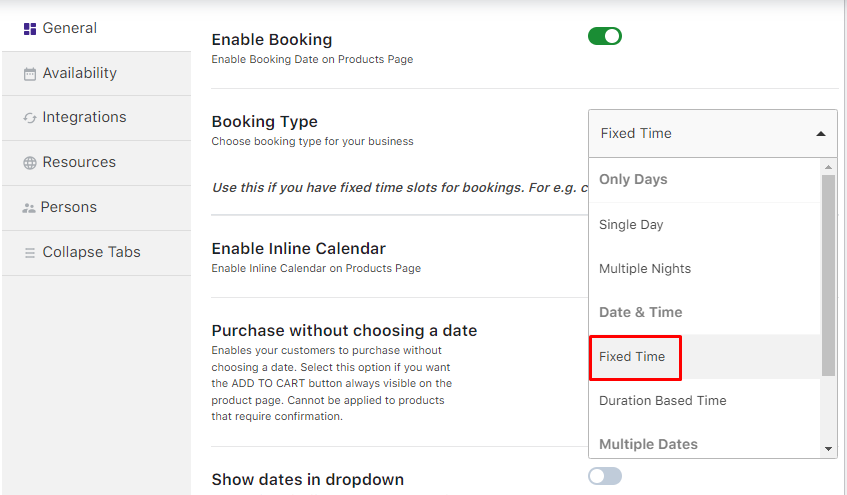
Go to the Availability Tab next.
The Advance Booking Period (in hours) field will allow you to specify how much time in advance, the appointment can be booked This ensures that the customers avoid booking a slot for an appointment just a few minutes before the actual timing. In this case, let’s go with 24 hours.
This implies that an online appointment booking can be done only 24 hours before the appointment date. Thus booking for the same day slot will not be possible and only next day bookings will be enabled.
Next, the Number of Dates to Choose field will let you determine the maximum number of days for booking appointments from the present day. It could be set to a month (30 days) or even a year (365 days).
Let’s set it to 365 days, which would mean that the calendar will show dates for a year to make this appointment.
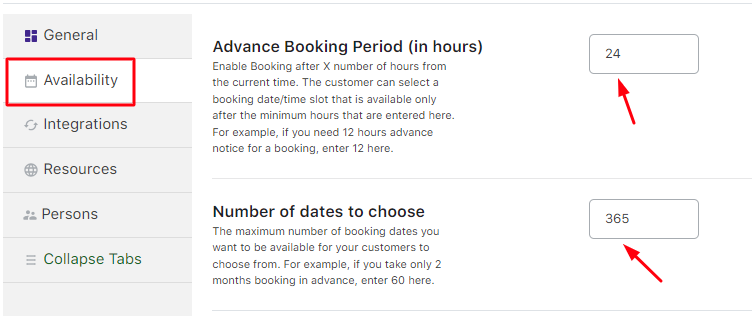
Adding Advance Booking Period & Number of dates to choose
Moving forward, you need to add the weekdays along with the time slots when the doctor will be available for appointments.
First, select the days from the Weekdays table and add the maximum number of appointments that can be taken on that day as shown below:

Selecting Weekdays for booking appointments
These settings will ensure that the selected weekdays will be available every week for an appointment and will be repeated for the number of dates you have selected in the Number of dates to choose a field as shown in the above screenshot.
Next, add the timeslots for the appointments from the Set Weekdays/Dates & It’s Timeslot table.
Click the Add New Timeslot link to do so.

Adding Timeslots for booking appointments
The selected weekdays will appear and you can add different timeslots for each weekday.
In this case, select All weekdays.
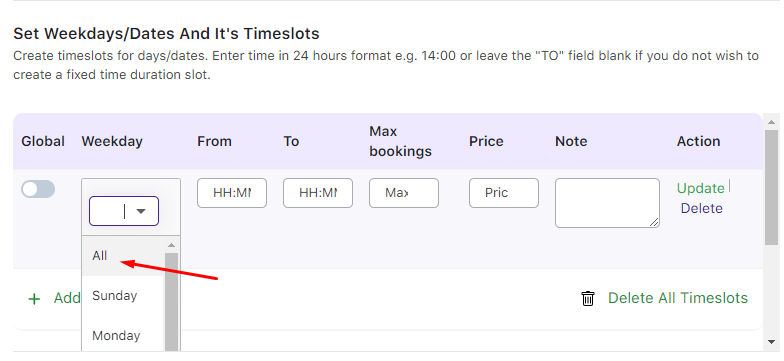
Selecting all weekdays
Enter the timeslots from 10 AM to 2 PM and 4 PM to 7 PM.
The Max bookings field allows you to set maximum appointments for that particular time slot. Once the threshold is reached, the timeslot is locked for taking further bookings. In this case, once 10 bookings have been made, this timeslot will not be available for selection.
The Price for the time slot field will let you add different prices for each time slot.
In this instance, the $100 price is already set to the Regular price ($) option in the Product data metabox.
Hence, you can leave that field blank and just add the From time & To time for each time slot.
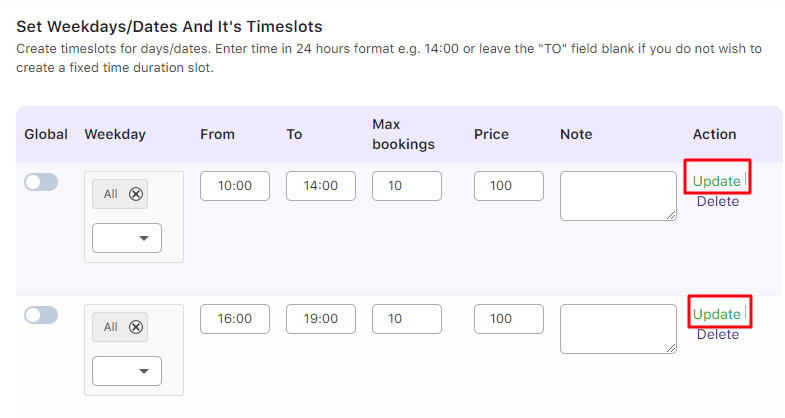
Updating a timeslot
Click on the Update button to save these settings.
Note – It is mandatory to add the Regular Price for the product on the Product Page irrespective of adding the price in the Availability tab. This ensures that the product is available on the Shop page to sell and move to the cart.
Once your timeslots have been added, you can Edit or Delete them using the Actions section as shown below:
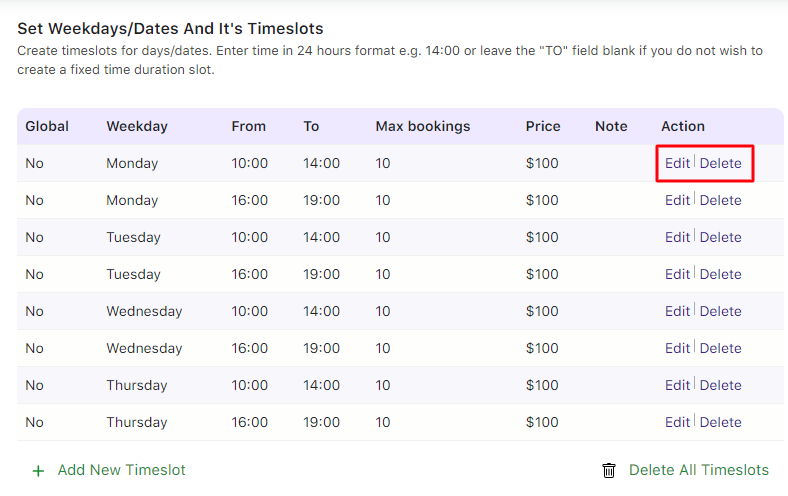
Actions section
When editing a timeslot, you can change the timings, max bookings, and price.
Once done, click the Update button.
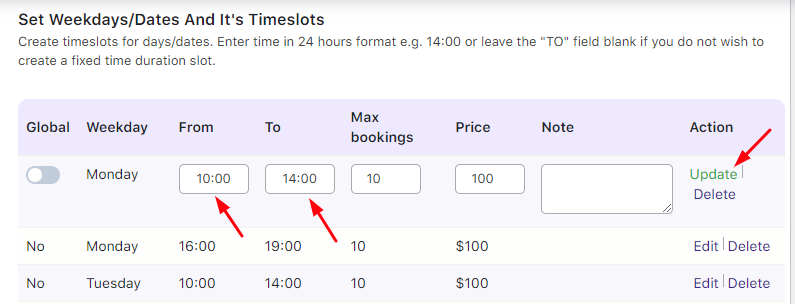
Editing a timeslot
Your product is now ready to take bookings for doctor’s appointments.
Let us now look at how these settings would reflect on the front end for customers to make bookings.
Customer Section
The newly created product is ready to accept bookings for Dr. Phil’s Clinic.
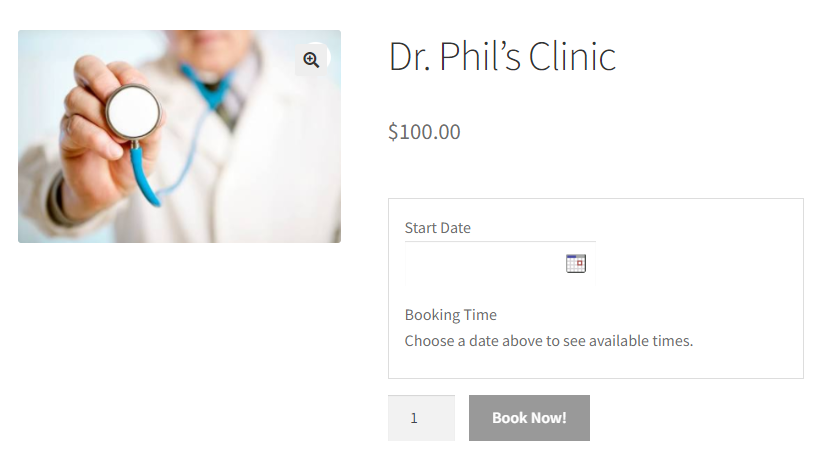
Product displayed on the front end
Select the date of appointment from the calendar by clicking the Start Date field. Only the selected weekdays which were set in the admin section will be enabled as shown below:
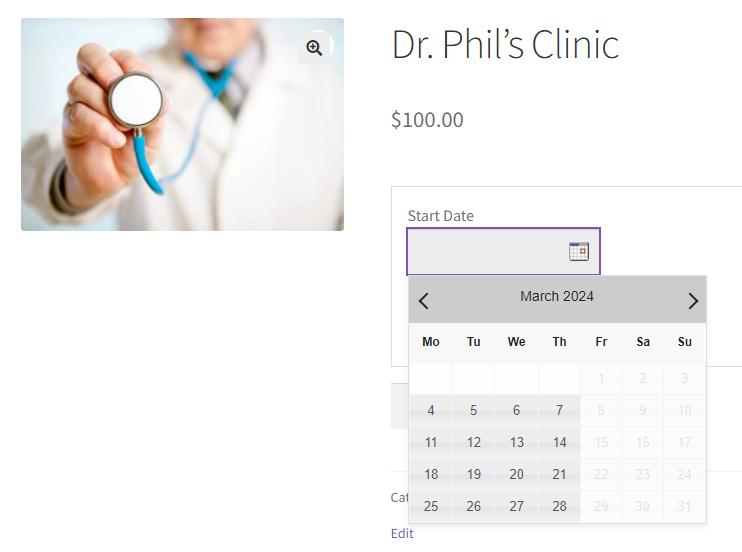
Selecting the Date for the appointment
Now add the appointment timeslot by clicking on the Booking Time field.
The available timeslots for the selected date will be displayed and you can book your preferred appointment time.
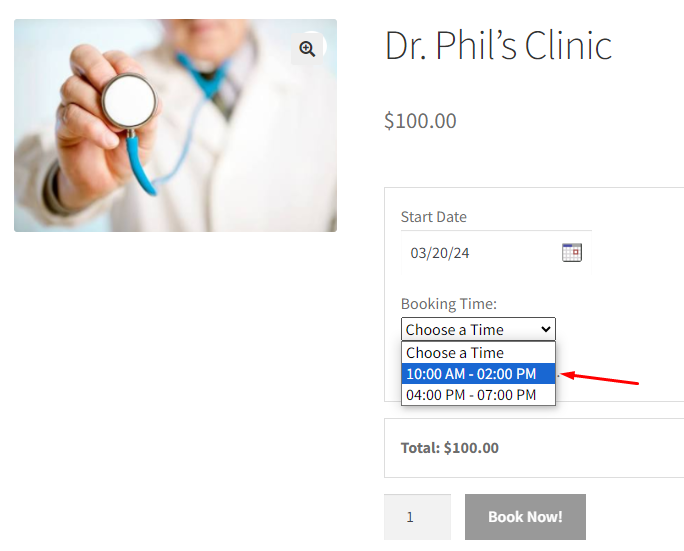
Selecting the timeslot from drop-down
Once you select the start date and time slot, the Book Now! button will be enabled as shown below:
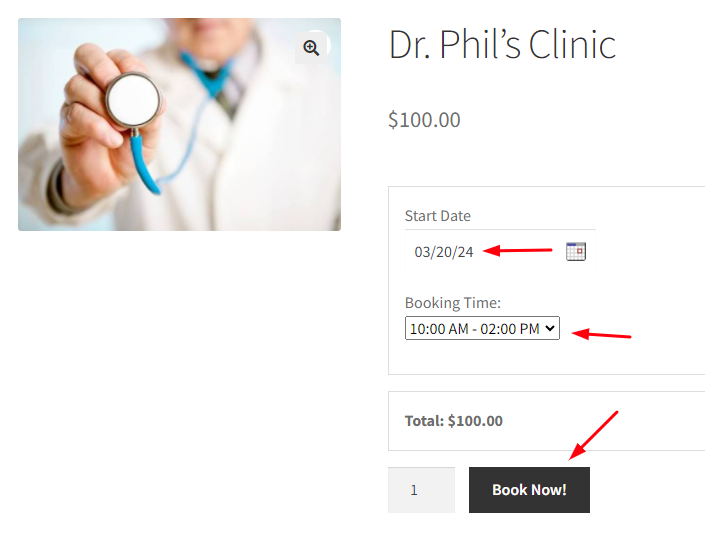
Book Now! button is enabled
When you click it, the order is added to your cart.
Clicking the View Cart button will redirect you to the Cart page which will show the appointment details:
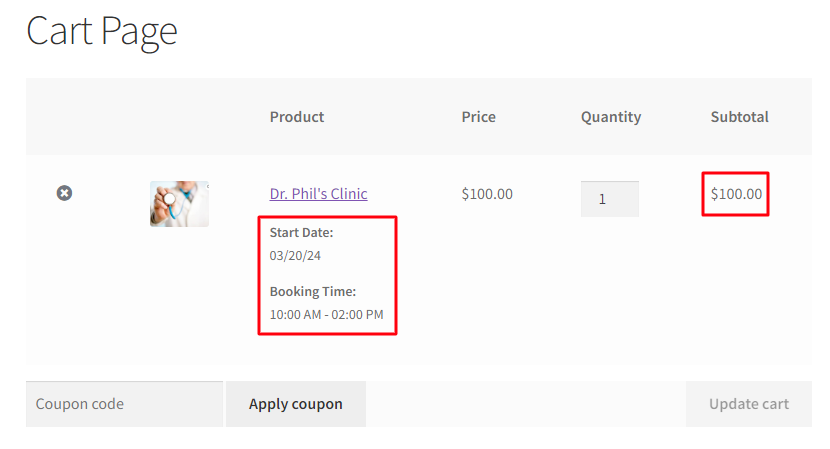
Details on the Cart page
Clicking the Proceed to checkout button will take you to the Checkout page which gives you a preview of the actual order.
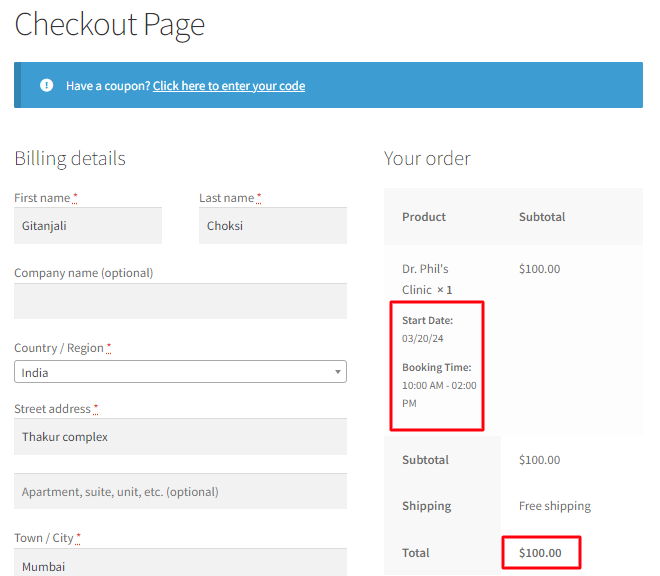
Booking details on the Checkout page
Your order is now placed and you will receive an order confirmation as shown below:
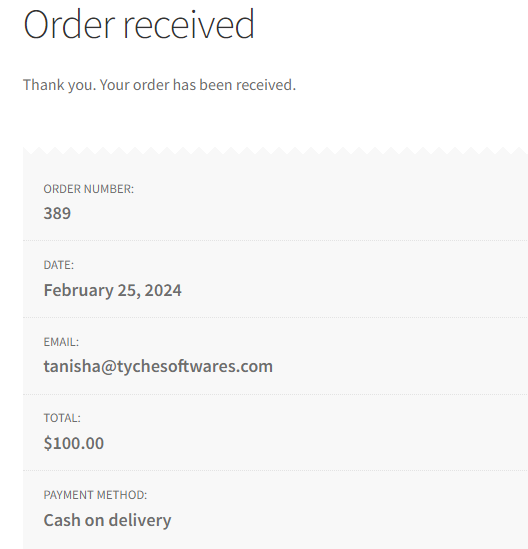
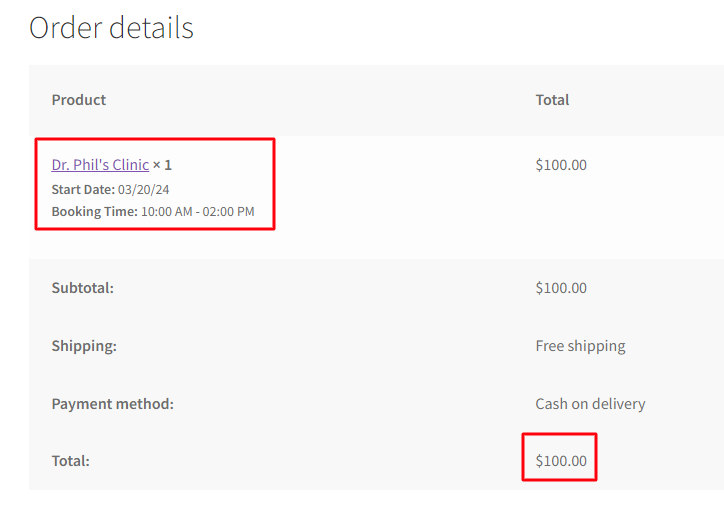
Order Confirmation page showing all booking details
An email notification is sent to the customer and administrator with these appointment details.
Although the above example was for Simple Products, you can try your hand at using this setting with WooCommerce Variations!
Ensure that you are never over-booked and set up appointments for Massage Centers, Hair Salons, Therapists, etc. The Booking & Appointment Plugin for WooCommerce plugin is here for you!